
Version 2.1.1
Shortcut Keys
| Mac | Windows | |
|---|---|---|
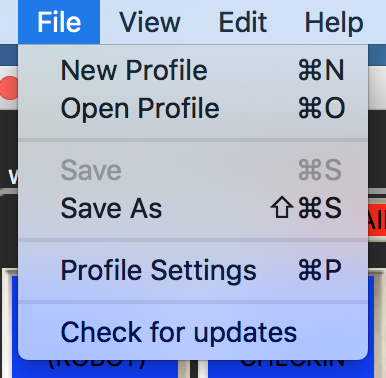
| New Profile | ⌘ + N | Ctrl + N |
| Open Profile | ⌘ + O | Ctrl + O |
| Save | ⌘ + S | Ctrl + S |
| Save As | ⌘ + Shift + S | Ctrl + Shift + S |
| Preferences | ⌘ + , | Ctrl + , |
| Profile Settings | ⌘ + P | Ctrl + P |
| Toggle Between Programs | ⌘ + Tab | Alt + Tab |
| Fullscreen | Alt + F | Alt + F |
| Half Screen | Alt + H | Alt + H |
| Player 1 | - key |
| Player 2 | = key |
| Player 3 | [ key |
| Player 4 | ] key |
| Player 5 | ; key |
| Player 6 | ' key |
| Single Play On / Off Toggle | / key |
| Global Hot Key Temporary Off | \ key |
| Global Hot Key Temporary On | ` key (on same key as ~) |
Tutorial Videos
Getting Started
Mac Users
Go to your application folder and double-click the KueIt option to launch the software. To make things easier, you can drag KueIt onto your Dock; this will allow you easier access when opening KueIt in the future.
Windows Users:
Go to your Start menu and scroll to Programs. Double-click the KueIt option to launch the software. Once KueIt is open, you can begin creating your profile.
Creating A Profile
KueIt allows you to save your own configuration of audio keys, key colors, audio banks, and bank colors; it also lets you save and load multiple profiles. When using KueIt, we recommended that you create a profile name before you begin loading your audio. Doing this is easy!
To create a profile name, go to File from your drop-down menu and click Save As. A pop-up window will open; using this pop-up, select a name for your profile and a directory path, which is the location on your computer where your KueIt profile will be stored. Choose a name and location (for example: MrVinceProfile.kue), and click Save. We recommend that you save your profile in the same folder location as your audio files, so it will be easy for you to find. Once your profile has been saved, you can start loading audio and color schemes! Note: we suggest that you click Save whenever you make changes to your profile.
Loading Audio To A Key
To load audio to a key, drag the audio file (mp3, wav, ogg, aiff, etc) to the desired key. The audio will load to the key and Auto-Kue to the first sound detected in the file. You can also right-click on the key you would like to load audio to (Mac users: the 'secondary click' or 'right-click' is Ctrl combined with a mouse-click), and a pop-up menu will appear. In this pop-up, you can use the Browse button to find the audio you're looking for. Click Open to load your audio to the desired button. At this point, you can select a key color, the playmode, the tag info for the key, the volume and the offset. All of these steps can be done at once in the same pop-up window, or one at a time as you think of changes you'd like to make. Again, we recommend that you click Save after each change you make to your profile.
View tutorial video on Adding audio to a key
How to Select the Start Point, End Point, and Looping
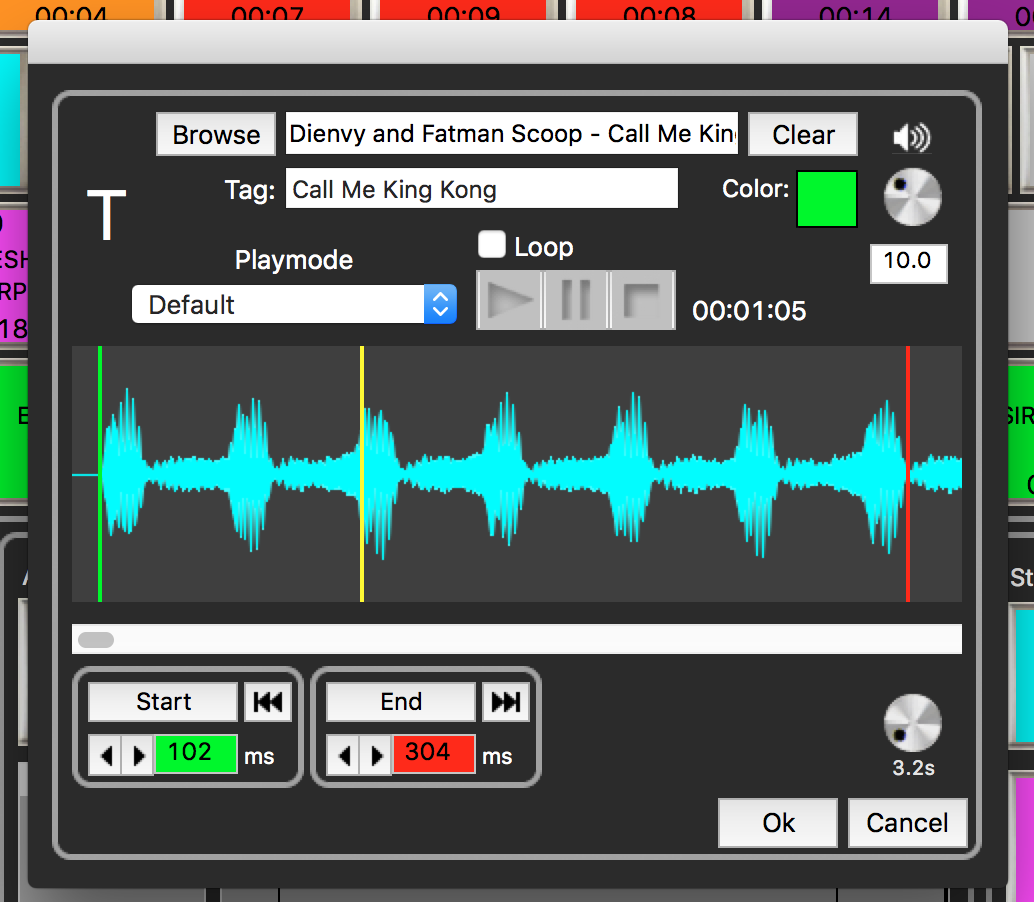
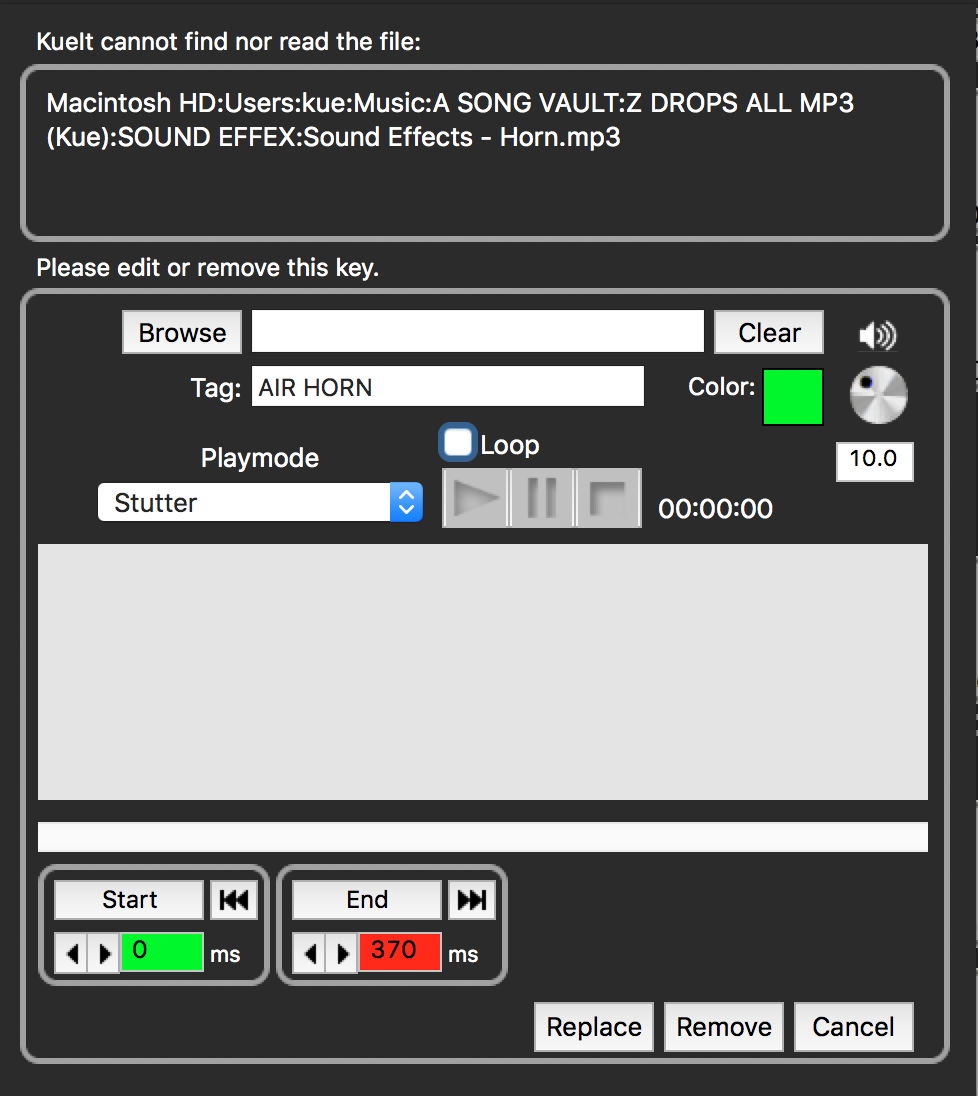
Most audio files have a bit of dead air in the beginning of the file; this offset lets you set a new start point at the part of the file where the audio begins. This allows for a quicker and much more accurate triggering process. To set the offset, right-click on the key you would like to set the offset to. If the button already has audio assigned to it, KueIt will begin to draw the waveform of the file; if the audio has not been selected, simply click the Browse button and select your audio. Once the audio is selected, the waveform will begin to draw. By default, KueIt will find the first sound in the audio file and set that as the Offset for that key (Note: Auto-kue can be turned on or off using the Preferences menu); if you don't like that start point, click anywhere in the waveform and click the Offset, Start button. This will set a new Offset. To fine-tune your Offset, you can click the left and right arrows in the Offset section. Depending on your system, KueIt will either draw the entire waveform or the first 15 seconds by default (see Adjusting the Waveform Display for more).
To find the end point of a file, use the same process as above--the only difference is that you click the End button instead of the Start button! The double-arrow button next to the Start button will send the cursor to the beginning of the file, and the double-arrow button next to the End button will send the cursor to the end of the file. Once you've selected the desired start and end points, you can choose to loop the file or play it normally. To loop the file, just check the box next to the word Loop. When you're finished in the edit window, click OK.
Adjusting the Waveform Display
KueIt will only draw the first 15 seconds of the waveform by default; this is because the most frequently desired Offset is within the first 15 seconds of the audio file. If you want to see more of the waveform, simply click on the drop-down menu titled Waveform Length and select 15 sec, 30 sec, 1 min, 2 min or ALL (You can also change these values permanently in KueIt Preferences). If you choose a length and later change your mind, just click the Esc key on your keyboard and the waveform will stop drawing at that length within the file.
Selecting A Key Color
Right-click on the key you want to set a color to, and click on the square Color button. Select a color and click OK.
Selecting A Playmode
Right-click on the key you want to set a playmode to. Click one of the three choices: Default, Stutter or On/Off, then click OK. The Default mode will play the file at the default setting of your profile; the On/Off mode will override your profile's default setting and always make that specific key toggle between Play and Stop (i.e. PLAY then STOP then PLAY then STOP as you toggle the key); the Stutter mode will set the key to always replay the audio from the beginning of the file (i.e. every time the key is struck, it will restart the file from the beginning). The Stutter mode will also override your profile's default setting, and always make that specific key stutter.
Selecting the Audio Volume of a Key
Right-click on the key you want to set the audio volume to. In the pop-up window that appears, use the knob on right to adjust the volume. You can hit the Play and Stop keys in this pop up window to test the volume, and to reset the volume to 10, click on the knob while holding the Shift button. If the selected key is playing, only the Volume box will open and you can adjust the volume on the fly. If the file is not playing, the complete Edit box will open and you will be able to adjust all the settings for the selected key.
Selecting Tag Information to Display on a Key
The tag information will default to the filename of the audio that is loaded to the key; however, once the audio is selected, you can choose to change the tag information to whatever you desire. Simply right-click on the key you want to set the tag information to, click on the text box next to the word Tag and type whatever tag information you desire. Next, click OK to save the new information.
Editing Your Default Profile Settings
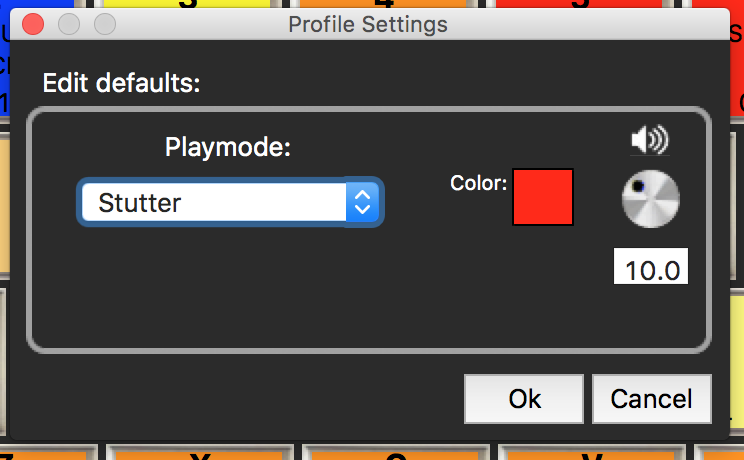
To edit your default KueIt profile settings, choose File from the drop-down menu and then choose Profile Settings. This will open a pop-up window, which will give you the option to change the play mode, offset and color of every BLANK key in your profile. This will also affect any keys that you have set to default, but it will NOT override the settings you have already set for individual keys! Note: the changes made to your default will not become visible until you load audio to a key.
How do Banks Work?
You can load 38 different audio files in each bank; this allows a total of 304 different audio files to be loaded at one time. The F keys (F1 through F8 at the top of your keyboard) are used to switch between the 8 different banks, and you can press an individual F key (or click the on-screen F key via the mouse) to select the bank you want. Loading the audio keys works the same way for every bank, and the audio will load to the key in the selected bank only.
For example: If you are in F1: Bank 1 and you load audio to key B, it will only be loaded on that key in Bank 1. You will be able to load a different audio file to key B in Bank 2, 3 etc.)
Tagging and Adding Color to a Bank
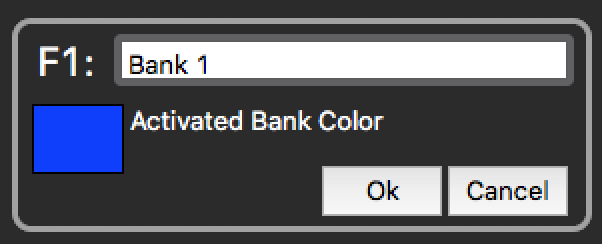
You can title a bank to make it easier to remember what audio you're storing in it (i.e. F1: sound efx, F2: drops etc.), and you can also color the F keys to make them stand out for quick reference. To name and/or color the F keys, right-click on the desired F key. In the pop-up window, click on the text box and replace the default text with your desired text. Then, to choose a color, click on the square Color button. Select a color and click OK. To finish the process, click OK again. Remember to save the changes to your profile when you are done!
Note: the bank's color will only be visible when the bank is selected.
Using KueIt
Launch KueIt and select the profile you want to use if it hasn't auto-loaded.
Loading a Profile
Click File from the drop-down menu, then click on Open Profile. A pop-up window will open. Locate your profile in your computer's directory and then click Open.
What is Error Checking?
KueIt goes through a process called error checking at startup and every time a different profile is loaded. This is to make sure all your audio files are still in their correct locations; if they are, your profile will open smoothly and you can begin to use KueIt.
If KueIt discovers that a file has been moved from its specified location, KueIt will display the name and directory of the missing file and give you three options:
- Relocate or Replace the missing file
- Remove the file in question from your profile, and load the profile without the missing file
- Cancel the load operation altogether
If you want to Relocate or Replace, simply click on Browse; a pop-up window will open, allowing you to browse your computer for the missing file or a replacement. Choose a file and click Open, then click Replace. Repeat this step for each missing file. Remember to save your profile when you are done fixing it! You'll also have the ability to save this profile as a new profile, which gives you the option to use the original profile configuration at a later date.
Playing an Audio File
There are two ways to play an audio file using KueIt. To play a loaded file, simply press the key associated with the file. You can also use the mouse and click on the on-screen display button. You can also use the bottom 6 players to play randomly loaded files.
View tutorial video on How to play audio
Using the Bottom Player Section
Loading the players is very similar to loading a key. Right-click on the player you want to load, and follow the same steps you used to load your keys. To play audio, use the on-screen play buttons or the keyboard shortcut keys. The shortcut key displays are located above the Play key on each player.
| Player 1 | - key |
| Player 2 | = key |
| Player 3 | [ key |
| Player 4 | ] key |
| Player 5 | ; key |
| Player 6 | ' key |
Single Play vs. Simultaneous Play Mode
Single Play Mode will only allow you to play one file at a time. If an audio file is playing and you trigger another file, it will begin playing in place of the first file.
Simultaneous Play Mode lets to play an unlimited amount of files simultaneously. If audio is playing and you trigger another file, the two files will start to play together as a mix. You can continue to trigger files in this fashion, and they will all play simultaneously.
Simultaneous Play Mode is the default upon installation. To switch back and forth between Play modes, click the on-screen Mode button located between the Stop Sign and Half Screen Mode buttons. The Mode button displays a musical note; Single Play will also display a music note, and Simultaneous Play will display a musical note with a + next to it.
Stopping an Audio File
There are a few different ways to stop an audio file from playing after it has been triggered. The most simple way is to click the red Stop Sign button on the on-screen display; you can also press the Space bar on your keyboard, which will stop all audio that is being played from KueIt. Pressing the Esc key on your keyboard will also stop all KueIt audio, but please note that the Esc key is disabled as a stop function while KueIt is in Global Hot Key mode. This is to prevent you accidentally exiting from another opened program! If your Play Mode is set to On/Off, pressing the desired key once will start the audio and pressing it again will stop the audio.
See Selecting A Playmode for directions on how to set your Play Mode.
If you only want to stop a selected key, press Shift at the same time as the key you would like to stop or you can right-click the key while it's playing, and hit the Stop button.
Setting Up Playlists
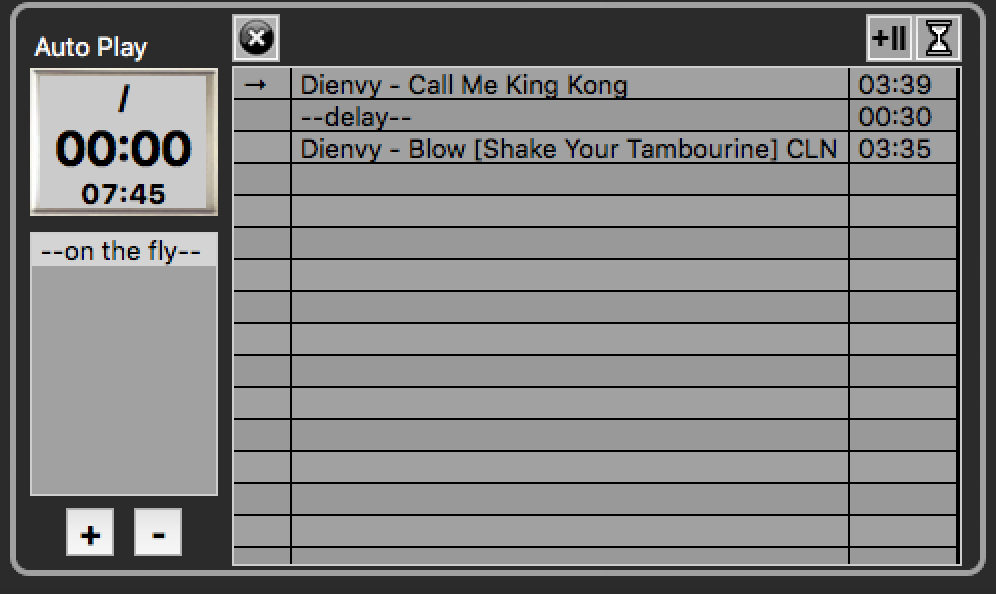
KueIt allows you to create playlists for auto-playing. To create a playlist, simply click on the Plus sign in the Auto-Play section of the Main screen; you can rename your playlist by double-clicking on it.
The on-the-fly playlist is used for creating a temporary playlist. You can simply drag and drop audio files into your existing playlists, and you can rearrange the file order within a playlist by dragging files into the desired order. You can also drag tracks from one playlist to another! When you hit the Play button in the Auto-Play section, your audio files in the currently selected playlist will play in order, depending on the Start and End markers. You can edit this just the same way you edit Keys: by right-clicking the audio file in the playlist.
If you want to pause the playlist after a certain file, just add a pause track by clicking the +|| button at the top. When the playlist reaches a pause track, it will temporarily stop the playlist until you hit the play button again.
If you want to add a delay instead, just click on the ⏳ button--this works a little differently than the pause track. When the playlist gets to a delay track, it will pause the playlist until the delay timer is finished and then continue to the next track on the playlist. To edit the delay time, just right-click the delay track.
If you need to delete tracks, select the tracks you want to delete and press the Delete key while holding down Ctrl (for Windows) or ⌘ (for Mac users). The - button below the playlist is used to delete only the playlist which is highlighted. You cannot delete the on-the-fly playlist; it is only intended as a temporary playlist. All other playlists and tracks can be saved to your profile by clicking Save in the File menu.
Controlling Playlists
You can play a playlist two ways: click the big button on the top left corner of the Auto-Play section (on the Main screen), or hit the shortcut key (which can be assigned in the Main tab of the Preferences window--you can MIDI assign this button as well). When you click the Play button, audio will start playing from the currently highlighted playlist; to stop play, you can hit the Space bar or Esc (this will stop all audio in KueIt), or hit the big button in the Auto-Play section while holding down the Shift key.
Also see Setting Up Playlists above.
In the playlist window, you will see 3 columns. The first column is the status of the track; the middle column displays the tag name (which can be changed by right-clicking the audio track); the last column displays the time for the audio or delay track (which can also be changed by right-clicking the track). To select the next track to play in the playlist, double-click the status column of the track. You will notice that there will be an arrow in the status column; this means that when the current track is finished, the track you just selected will play next. The playlist will continue in order from that point forward. After a track is played, a dot will appear in that track's status column. If the track cannot be loaded for any reason, the track will turn RED and will be skipped. Clicking the X at the top will clear the statuses of all tracks for the current playlist.
There are two timers in the big button of the Auto-Play section. The smaller timer displays the time of the track that is either currently playing or next in queue; the larger timer shows the time left in the current playlist.
What are the Different KueIt View Modes?
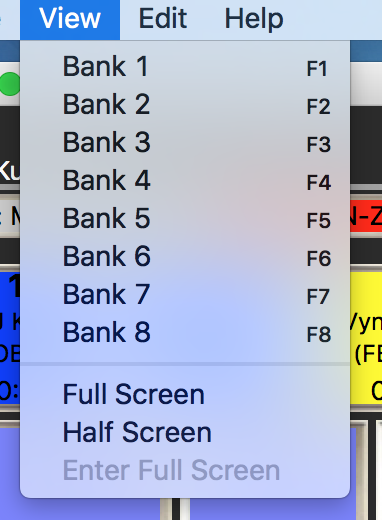
The 2 main views in KueIt are Full Screen Mode and Half Screen Mode.
Full Screen Mode is used when all the features of KueIt are needed from the Individual or Disk Jockey. To enter Full Screen Mode, simuntaneously press the Alt and F keys on your keyboard, or click View from the drop-down menu and then click Full Screen.
Half Screen Mode is helpful when you want to use KueIt at the same time as other audio applications or programs. In this mode, you can simultaneously press ⌘ + Tab (for Mac users) or Alt + Tab (in Windows) to toggle back and forth between programs; KueIt will only display play keys, and it will display at the bottom of the screen. This is because when you are toggled in KueIt, you can still see the main operational data of most other DJ software at the top of the screen. This allows for the best of both worlds! To enter Half Screen Mode, simultaneously press the Alt + H keys on your keyboard, or click View from the drop-down menu and then click Half Screen. You can also click the down arrow next to the Stop All button to enter Half Screen mode.
Note: the drop-down menu is not accessible while in Full Screen or Half Screen modes, but all shortcut keys will still work in these modes. If you prefer using the drop-down menu to edit, simultaneously press the keys Alt + F to exit Full Screen Mode or Alt + H to exit Half Screen Mode. This will make your drop-down menu reappear. If you prefer using shortcut keys, see the list below!
| Mac | Windows | |
|---|---|---|
| New Profile | ⌘+N | Ctrl+N |
| Open Profile | ⌘+O | Ctrl+O |
| Save | ⌘+S | Ctrl+S |
| Save As | ⌘+Shift+S | Ctrl+Shift+S |
| Preferences | ⌘+, | Ctrl+, |
| Profile Settings | ⌘+P | Ctrl+P |
What are Global Hot Keys?
When Global Hot Keys is on, your audio will trigger even if another program is running; this lets you run a second program simultaneously with KueIt. If Global Hot Keys is off, simunltaneously press ⌘ + Tab (on a Mac) or Alt + Tab (in Windows) to toggle back and forth between the two programs. The keyboard function will only work on the program that is currently in focus, unless Global Hot Keys is turned on (in which case the keyboard functions will trigger the KueIt audio even if KueIt is not in focus).
Note: the Global Hot Keys function is disabled when KueIt is first installed.
How to Enable/Disable the Global Hot Keys
To Enable the Global Hot Keys in Windows, click File from the drop-down menu and select Preferences; On a Mac, click KueIt from the drop-down menu and select Preferences. In Preferences, check the box next to Enable Global Hot Keys. When Global Hot Keys is enabled, you can still use shortcut keys to quickly turn this function on or off. Clicking the ` (back quote) key will turn Global Hot Keys on; clicking the \ (backslash) key will turn Global Hot Keys off.
Note: if Global Hot Keys is not enabled in the Preferences window, Global Hot Keys and the Global Hot Key On/Off shortcut keys will not work at all. This is to protect you from accidentally enabling Global Hot Keys.
View tutorial video on How to use Global Hot Keys
What are the Global Timers?
KueIt comes with two global timers, on either side of the Kuelt logo at the top of the screen; these count down audio that is either currently playing or next in queue. The timer on the left shows the time remaining on the shortest audio clip currently playing (i.e. the audio clip that will finish first), and the timer on the right shows the time remaining before all scheduled audio completes. If there is a playlist playing, all the audio up to the next pause, or the end of the list, will be this timer's main concern.
Assigning a MIDI device to KueIt
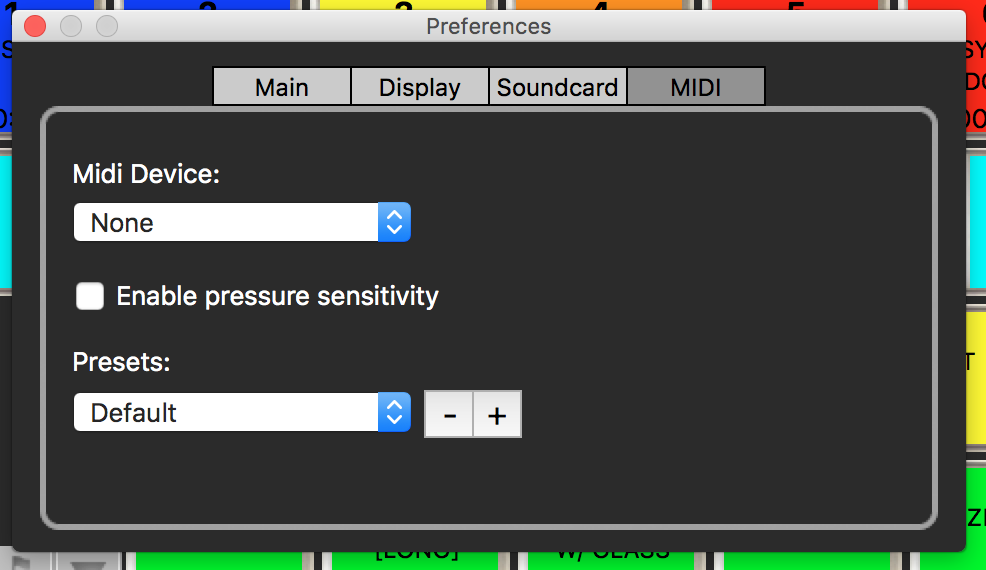
Make sure your MIDI device is connected to your computer, and then launch KueIt. Go to Preferences, click the MIDI tab and select the desired MIDI device from the drop-down menu. At this point, you can choose whether you want pressure sensitivity; if pressure sensitivity is enabled, then the keys’ volumes will be determined by how hard you hit the MIDI pad (the harder the hit, the louder the key will play). You can also select a title for your MIDI preset. KueIt allows you to save as many different presets as you want, for each MIDI device that you use with KueIt. If you choose not to save a preset name, KueIt will save your preset as default.
Note: When using KueIt with MIDI, make sure the program is never minimized. In some systems, minimizing a program can put it to sleep, which can cause the MIDI in KueIt to go to sleep as well.
Once your MIDI device has been assigned, you can begin to assign individual trigger keys and volumes, and you can also assign the Stop All key as well as others! To assign MIDI, click the MIDI button on the main screen of KueIt (located above the master volume knob). Scroll over the key or item you want to assign MIDI to, and a pop-up window will appear over the key. This pop-up window will give you the option of assigning a trigger, volume, or both to each individual key.
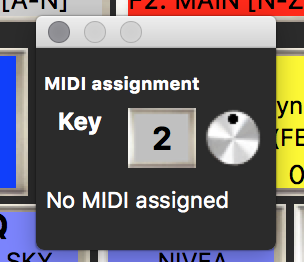
To assign a trigger, click on the Trigger Key icon in the pop-up window. Flashing red text will appear, instructing you to press the desired key on your MIDI controller; once you press the key on your controller, your MIDI will be set. To assign a volume, click on the Volume icon in the pop up-window. Again, flashing red text will appear, instructing you to adjust the desired knob or slider on your MIDI controller. Once that adjustment is made on your controller, your MIDI event is set. Repeat this process for each item you want MIDI assigned to, and when you're finished, click the MIDI button on the main screen to save your change (a pop-up window will prompt you to Save, Save As or Cancel; selecting Save will store all your settings).
Note: On startup, Kueit will always open to the most recently selected MIDI device and preset.
Loading a Recent Profile Function
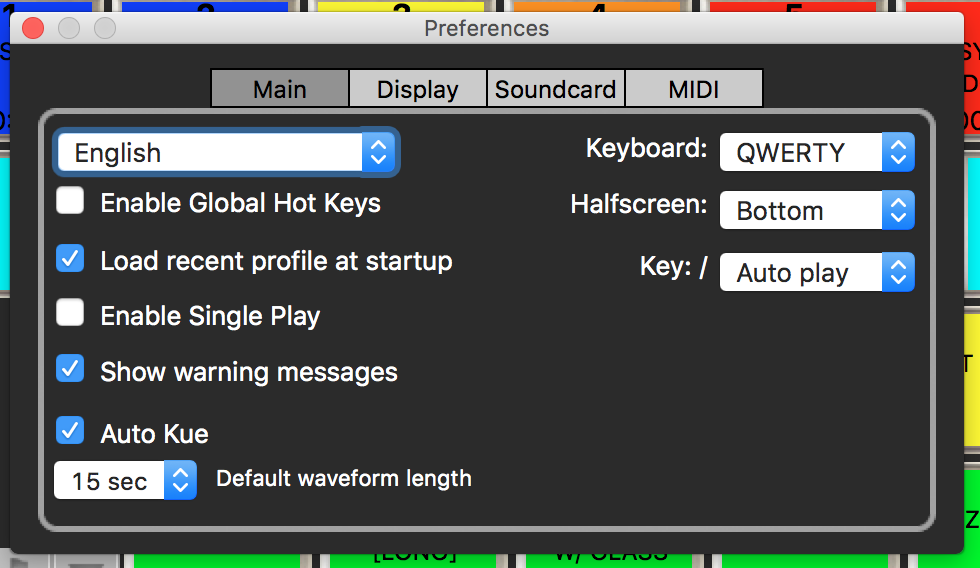
Mac users: click KueIt from the drop-down menu and select Preferences. Windows users: click File from the drop-down menu and select Preferences. In Preferences, click the Main tab. Enabling Load recent profile option will automatically load your las tprofile when KueIt is launched.
Note: Load Recent Profile is enabled on install.
Changing the Visual Playback Display
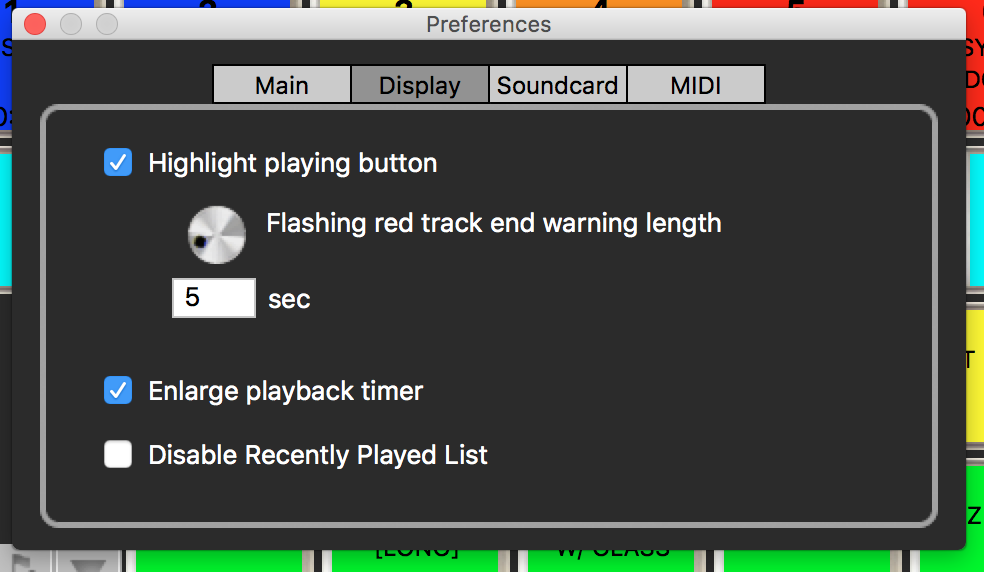
Mac users: click KueIt from the drop-down menu and select Preferences. Windows users: click File from the drop-down menu and select Preferences. In Preferences, click the Display tab; you can now select a number of different display options. The frame of the key or keys that are playing audio from KueIt will light up green then flash red 5 seconds before the track ends; this is the default setting, and it can be adjusted or disabled. To adjust how long you want the key to flash red, simply turn the knob or type the desired number of seconds in the box on the Display tab. You can uncheck this feature to disable it entirely, if you desire. You can also disable the enlarged Playback timer and the Recently Played list inside the Display tab.
Recently Played List
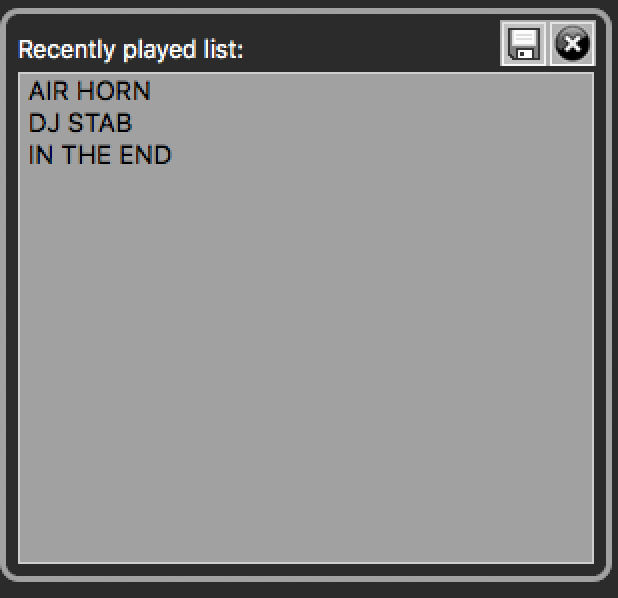
KueIt keeps track of all the files that are played during each session, and stores them in a list in the lower left corner of the program. This list is displayed in the order the files were played, beginning with with the most recent. You can export the Recently Played list and save it as a text file, by clicking the disk image button above it; in the pop-up window that opens, you can select a name and directory path for the document. If you would like to clear the Recently Played list, just click the X button located directly above it.
Outputting Audio From Your Hardware
KueIt will automatically use the default sound card in your computer to play audio, so we strongly suggest that you use a computer with a high-end sound card. A higher quality sound card will run KueIt more efficiently while giving you much cleaner audio!
If you're running KueIt from a Laptop, a 1/8th inch to RCA wire will come in handy. Simply plug the 1/8th inch end into the output from your computer, and the RCA end into an input on your DJ Mixer or PA system. This output size is the standard size for many desktop and tower computers, though you may find different style output jacks on some sound cards. KueIt will also work with external sound card devices.
Selecting a Sound Card

Go to Preferences, select the Soundcard tab and choose your desired sound card from the drop-down menu. Your sound card is now selected! This will remain the default sound card the next time you run KueIt.