Shortcut Keys
| Mac | Windows | |
|---|---|---|
| New Profile | ⌘ + N | Ctrl + N |
| Preferences | ⌘ + , | Ctrl + , |
| Toggle Between Programs | ⌘ + Tab | Alt + Tab |
| Bank 1 | F1 |
| Bank 2 | F2 |
| Bank 3 | F3 |
| Bank 4 | F4 |
| Bank 5 | F5 |
| Bank 6 | F6 |
| Bank 7 | F7 |
| Bank 8 | F8 |
| Stop All | Esc or Space |
| Single Play On/Off Toggle or Auto play (playlist) |
/ |
| Global Hot Kues Temporary Off | \ |
| Global Hot Kues Temporary On | ` on same key as ~ |
Getting Started
Mac Users
Go to your application folder and double-click the KueIt option to launch the software. To make things easier, you can drag KueIt onto your Dock; this will allow you easier access when opening KueIt in the future.
Windows Users:
Go to your Start menu and scroll to Programs. Double-click the KueIt option to launch the software.
Once KueIt is launched, you will need to activate it using your Mixcity Inc. login info or product key.
Upgrading From Older Version of KueIt
If you are upgrading from an older version, KueIt will detect any old profiles that are stored on your computer. If any profiles are found, KueIt will ask if you would like to import them. Follow the onscreen instructions if you choose to import your old profiles. If you skip this option, KueIt will launch with a blank Default profile for you.
Creating a Profile
KueIt allows you to configure audio keys, key colors, audio banks, and bank colors; it also allows you to have multiple profiles. Each profile has its own configuration of keys. You can have as many profiles as you like. KueIt comes installed with a default profile, but you may rename this profile or add more.
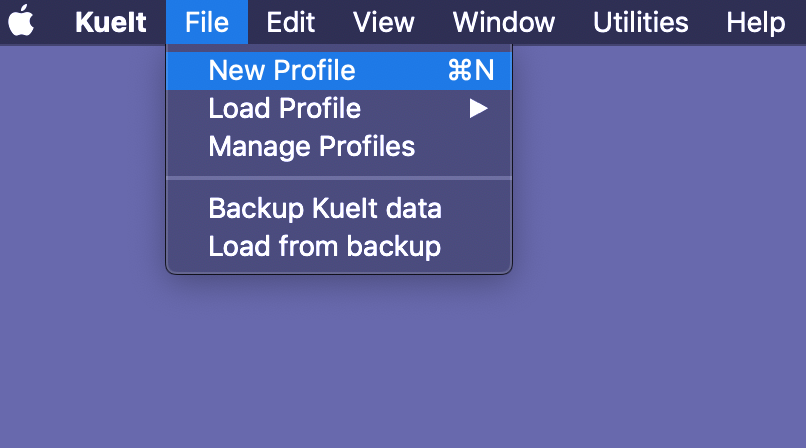
To create a new profile, go to the File menu and click New Profile. A pop-up window will open allowing you to enter a new profile name. Once you type in your new profile name, click on the ![]() to finish creating the profile.
to finish creating the profile.
Edit Key Window
The Edit Key Window is where you configure the audio clip for playback. You can also change how the key is displayed, such as the display name, key and font colors. To open the Edit Key Window, simply right click on the desired key.
Mac users: the 'secondary click' or 'right-click' is Ctrl combined with a mouse-click
Click any of the items in the list that corresponds to the image below to see more detailed information
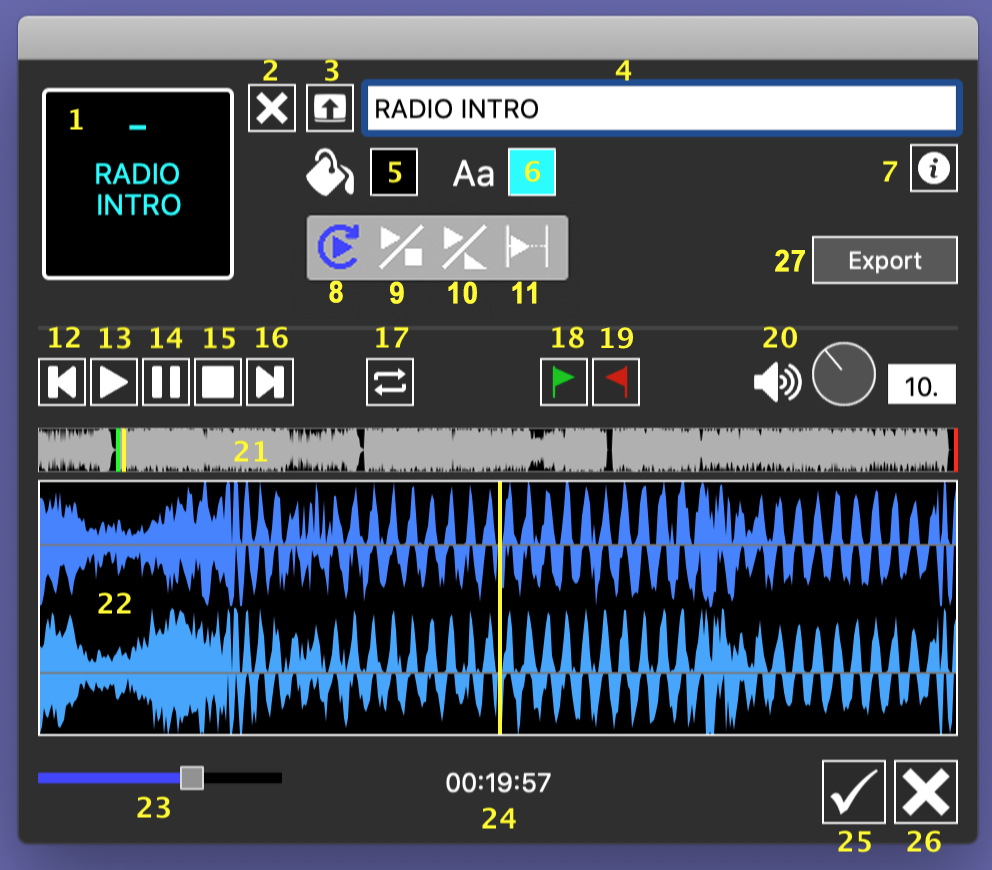
- 1. Key display
- 2. Remove audio
- 3. Load audio
- 4. Edit display name
- 5. Key color
- 6. Font color
- 7. Audio information
- 8. Playmode: Trigger
- 9. Playmode: Play/Stop
- 10. Playmode: Play/Fade
- 11. Playmode: Sticky
- 12. Jump to start
- 13. Play
- 14. Pause
- 15. Stop
- 16. Jump to end
- 17. Toggle looping
- 18. Set start point
- 19. Set end point
- 20. Volume
- 21. Waveform overview
- 22. Waveform
- 23. Waveform zoom
- 24. Play cursor position
- 25. Ok/Apply button
- 26. Cancel button
- 27. Export audio
Loading Audio to a Key
There are 2 ways to load an audio file to a key. In the main window, drag an audio file from your computer to the desired key. The audio will load to the key and Auto Kue to the first sound detected in the file. You can also open up the Edit Key Window to load the audio file.
Audio files that are currently supported: mp3, mp2, wav, aiff, & ogg

In this edit window, you can use the ![]() button to find the audio you're looking for. Click to load your audio to the desired button. At this point, you can select a key color, font color, play mode, display name, volume, start and end points.
button to find the audio you're looking for. Click to load your audio to the desired button. At this point, you can select a key color, font color, play mode, display name, volume, start and end points.
All audio files loaded into KueIt are auto-imported. This means that a copy of the audio file is saved into the KueIt system. This system prevents user errors like renaming or moving audio files.
Removing Audio from a Key
In the Edit Key Window, click on the ![]() button at the top to remove the audio file from the desired key. Doing so will clear this key.
button at the top to remove the audio file from the desired key. Doing so will clear this key.

You can load a new file by clicking the ![]() button, or leave it blank. To apply the change, click on
button, or leave it blank. To apply the change, click on ![]() in the window.
in the window.
Selecting the Start Point, End Point, and Looping
Most audio files have a bit of dead air in the beginning of the file. KueIt allows you to select a start point at the part of the file where the audio begins. This allows for a quicker and much more accurate triggering process. To do this, launch the Edit Key Window. If the button already has audio assigned to it, KueIt will begin to draw the waveform of the file. If the audio has not been selected, simply click the ![]() button and select your audio. Once the audio is selected, the waveform will begin to draw. By default, KueIt will use Auto Kue and find the first sound in the audio file and set that as the start point for that audio. Auto kue can be turned on or off using the Preferences menu. If you don't like that start point, read below on how to set a new one:
button and select your audio. Once the audio is selected, the waveform will begin to draw. By default, KueIt will use Auto Kue and find the first sound in the audio file and set that as the start point for that audio. Auto kue can be turned on or off using the Preferences menu. If you don't like that start point, read below on how to set a new one:

Setting a start point: Use the waveforms to find the position you would like to set the starting point. Use the zoom slider to zoom in the waveform for more precision. Click on the ![]() button to set the start point.
button to set the start point.
Setting an end point: Use the waveforms to find the position you would like to set the end point. Use the zoom slider to zoom in the waveform for more precision. Click on the ![]() button to set the end point.
button to set the end point.
Looping the audio: Once you have set the start and end points, you can click on the ![]() button to toggle looping on or off.
button to toggle looping on or off.
If looping is on, the audio will loop infinitely within the start and end points until you stop the audio manually. The key will also show a ↻ symbol on the bottom right corner of the display.
Using the Waveform Display
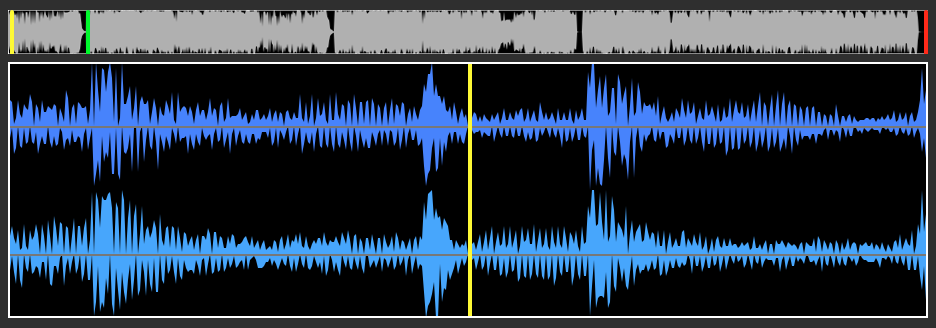
The waveform display helps you to set your start and end points. You can click or scrub in the smaller 'gray' waveform box by dragging your mouse inside it to position the play cursor. As you scrub, you will see the larger 'blue' waveform box update to the cursor playing point. You can drag the large waveform display left or right to move the cursor playing point. To zoom in and out of the waveform, just use the mouse scroll or adjust the slide below the waveform box.
Selecting the Play Mode
In the Edit Key Window, you can select one of the four play modes: Trigger, Toggle Play/Stop, Toggle Play/Fade or Sticky.

Here are the descriptions for each play mode:
 |
Trigger | Sets the key to always replay the audio from the set start point |
 |
Toggle | Sets the key to toggle Play/Stop. Press key once to play, again to stop the audio. |
 |
Toggle Play/Fade | Sets the pad to toggle Play/Fade. Tap once to play, again to Fade out the audio. |
 |
Sticky | Sets the key to play audio for as long as the key is held down. Audio will stop once the key has been released. |
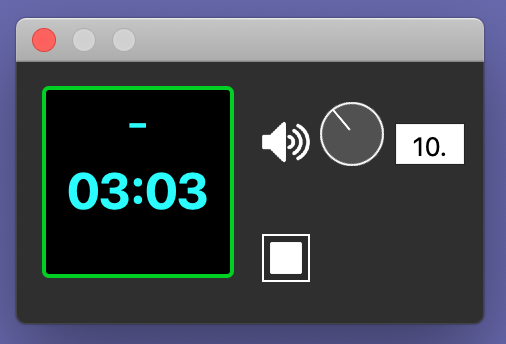
The Stop button in the lower left corner of the app, will display like the image below when it is in Stop All mode:

The Stop button in the lower left corner of the app, will display like the image below when it is in Fade All mode:

Selecting the Audio Volume of a Key
In the Edit Key Window, use the knob on right to adjust the volume, or you can type in a value in the box. Values are between 0 and 30, decimals accepted

You can hit the ![]() and
and ![]() keys in this window to test the volume. To reset the volume back to 10, click on the knob while holding the Shift button. If the selected key is already playing, a Volume Window will open and you can adjust the volume on the fly.
keys in this window to test the volume. To reset the volume back to 10, click on the knob while holding the Shift button. If the selected key is already playing, a Volume Window will open and you can adjust the volume on the fly.
Using the Transport Controls
In the Edit Key Window, you can manipulate the audio by using the transport controls, such as playing and stopping the audio.

Here are the descriptions for each control:

|
Jump to start | Sets the play cursor to beginning of the audio file |
 |
Play | Starts playback from the cursor position |
 |
Pause | Pauses the audio at cursor position |
 |
Stop | Stops the audio, and cues position to start point |
 |
Jump to end | Sets the play cursor to end of the audio file |
Edit Key Display
In the Edit Key Window, you can see a preview of how the key looks like with the current configurations. The key display is shown on the upper left corner:

To edit the key's display, you can:
Selecting the Key's Display Name
The display name will default to the filename of the audio that is loaded to the key; however, once the audio is selected, you can choose to change the display name to whatever you desire.

At the top of the Edit Key Window, type the display name. Then, click the ![]() to apply the change.
to apply the change.
Selecting the Key and Font Color
In the Edit Key Window, click on the square color buttons. A color picker will open.

The color box on the left changes the color of the key's background. The color box on the right changes the key's font color. You can see your changes in the Key Display on the left.
Exporting the Audio
In the Edit Key Window, click on the button to have KueIt save a copy of the audio file to a location on your computer.
Viewing information of the audio
In the Edit Key Window, click on the ![]() button to view information about the audio file. Information includes:
button to view information about the audio file. Information includes:
- Original filename
- Title
- Import date
- File type
- File size
- Audio channels
- Bits
- Bitrate
- Duration
Using Banks
You can load 38 different audio files in each bank; this allows a total of 304 different audio files to be loaded at one time. The F keys (F1 through F8 at the top of your keyboard) are used to switch between the 8 different banks, and you can press an individual F key (or click the on-screen F key via the mouse) to select the bank you want. Loading the audio keys works the same way for every bank, and the audio will load to the key in the selected bank only.

For example: If you are in F1: Bank 1 and you load audio to key B, it will only be loaded on that key in Bank 1. You will be able to load a different audio file to key B in Bank 2, 3 etc.)
Editing the Bank's Display
You can select the display name of the bank to make it easier to remember what audio you're storing in it (i.e. F1: sound efx, F2: drops etc.), and you can also color the F keys to make them stand out for quick reference. To name and/or color the F keys, right-click on the desired F key.
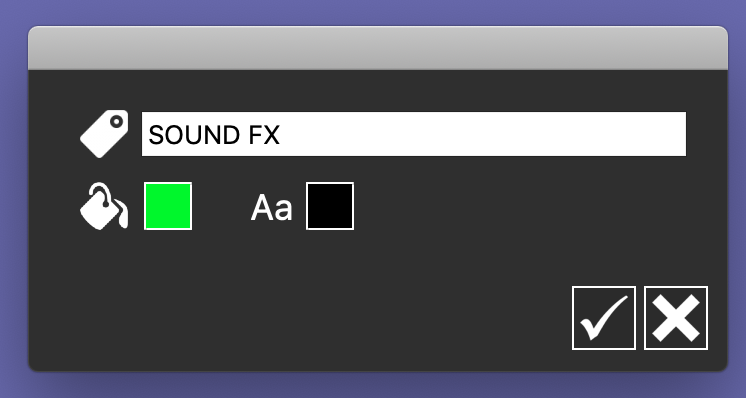
In the pop-up window, click on the text box and replace the default text with your desired text. Click on the square color buttons to select the bank and font colors.
Note: the bank's color and font color will only be enabled when the bank is selected.
Using KueIt
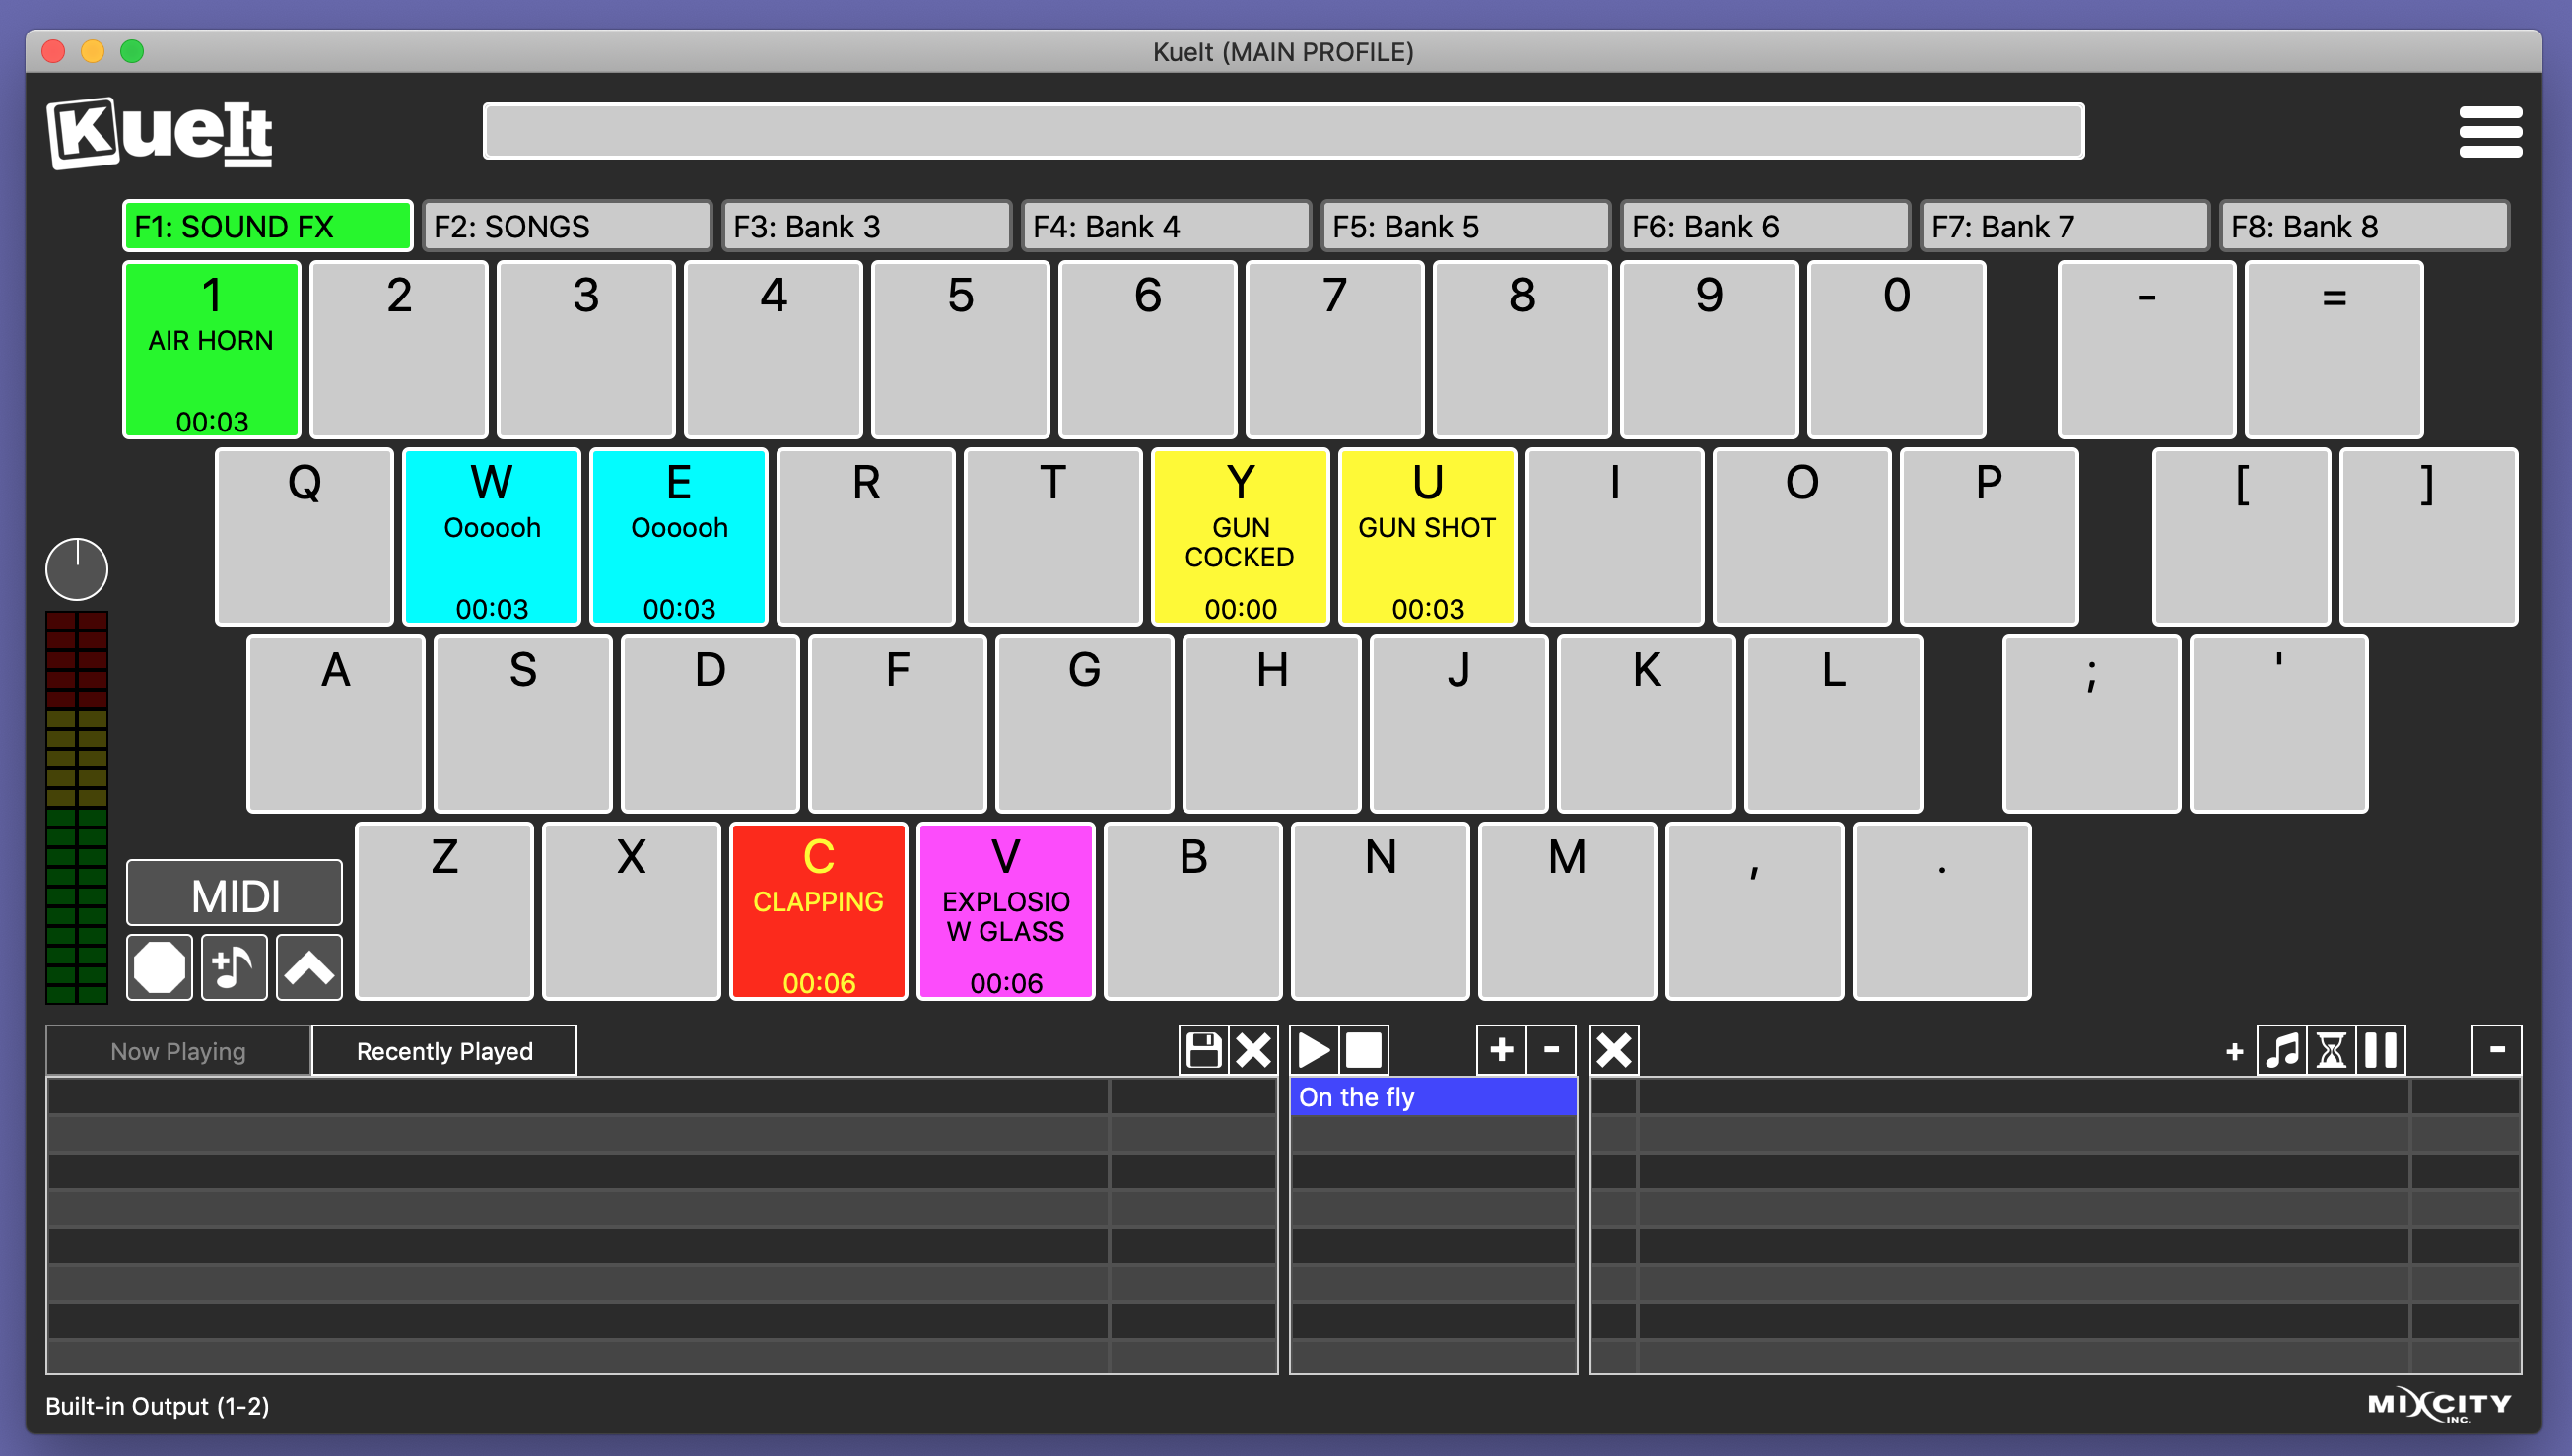
When you launch KueIt, your last used profile will be auto-loaded. You can:
Loading a Profile
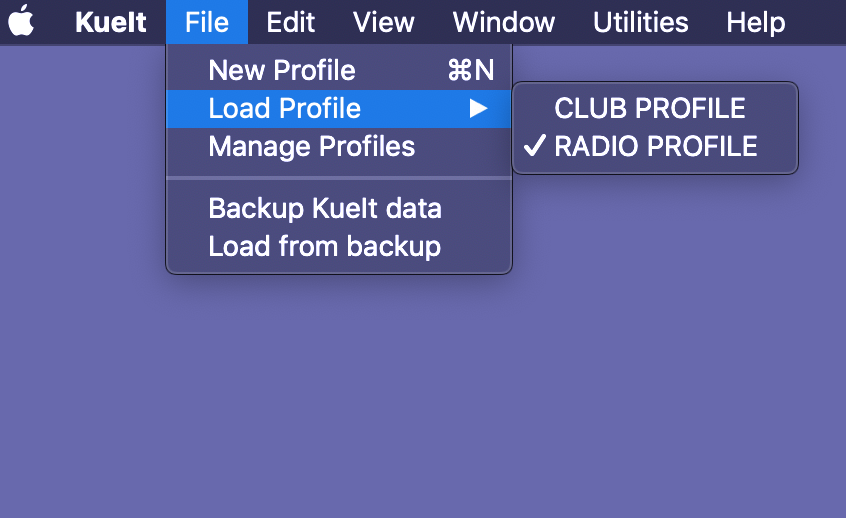
Click Load Profile from the File menu. Then, click on the profile name in the list you wish to load.
Playing an Audio File
There are 3 ways to play an audio file using KueIt:
- Pressing the keyboard key associated with the file
- Mouse clicking the on-screen display button
- Pressing an assigned MIDI button. See Using MIDI
Using the Global Keys Section
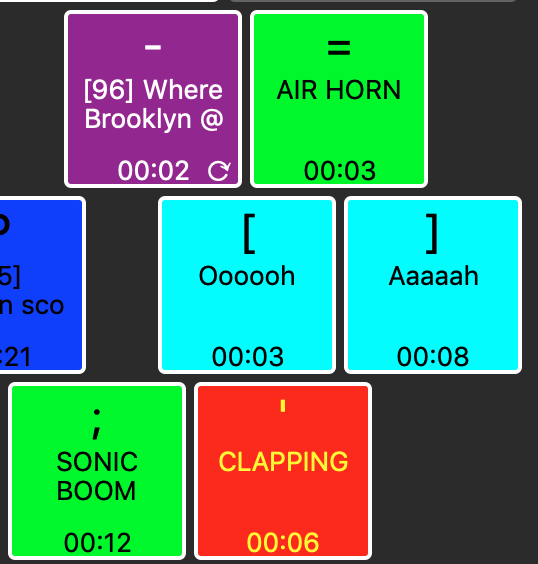
Loading the Global Keys (farthest 6 keys to the right of the main window) is very similar to loading any other key. The only difference is that the Global Keys are not associated with any banks. This means that these 6 keys are accessible no matter what bank you are in.
Single Play vs. Simultaneous Play Mode
Single Play Mode will only allow you to play one file at a time. If an audio file is playing and you trigger another file, it will begin playing in place of the first file.
Simultaneous Play Mode lets to play an unlimited amount of files simultaneously. If audio is playing and you trigger another file, the two files will start to play together as a mix. You can continue to trigger files in this fashion, and they will all play simultaneously.
Simultaneous Play Mode is the default upon installation.
To switch back and forth between play modes, click the on-screen mode button located between the Stop Sign and Half Screen Mode buttons, or hit the shortcut key / (shortcut key needs to be enabled in the Keyboard Settings tab of the Preferences Window
Single Play will display a music note:

Simultaneous Play will display a music note with a + next to it:

Stopping an Audio File
There are a few different ways to stop an audio file from playing after it has been triggered. To manually stop a specific audio file from playing, trigger the audio key again while holding the Shift key. If your key's playmode is set to Toggle, then holding the Shift key is not needed. You can also right click the playing file to launch the Volume Window and click on the ![]() button.
button.
To Stop All audio from playing, you can:
- Click on the
 button in the
main window
 - Press the Space key on your keyboard
- Press the Esc key on your keyboard
Please note: the Esc key is disabled as a stop function while KueIt is in Global Hot Kue mode. This is to prevent you accidentally exiting from another opened program
See Selecting A Playmode for directions on how to set your Play Mode.
Master Section
On the main KueIt screen, you will see the Master Section on the left side. Adjusting the master knob will adjust all sound coming out of KueIt. To reset it back to the default volume, click on the knob while holding the Shift key.
In this section, you will also see the output levels. The levels are divided into 3 colored segments:
- Green: Safe zone, free of any clipping or distortion
- Yellow: Caution zone
- Red: Should be avoided. Possible clipping and distortion
Highest peak level is sustained in the display for a brief second so that it is easier to check the peak
Setting Up Playlists
KueIt allows you to create playlists for auto-play. To create a playlist, simply click on the ![]() button in the playlist section of the main window. You can rename your playlist by double-clicking on it.
button in the playlist section of the main window. You can rename your playlist by double-clicking on it.

The On the fly playlist is used for creating a temporary playlist. To add audio to a playlist, click on the ![]() button or simply drag and drop audio files from your computer or KueIt into your existing playlist. You can then rearrange the file order within a playlist by dragging files into the desired order. You can also drag tracks from one playlist to another. When you hit the
button or simply drag and drop audio files from your computer or KueIt into your existing playlist. You can then rearrange the file order within a playlist by dragging files into the desired order. You can also drag tracks from one playlist to another. When you hit the ![]() button in the playlist section, your audio files in the currently selected playlist will play in order using its start and end markers. You can edit this just the same way you edit Keys, by right-clicking the audio file in the playlist.
button in the playlist section, your audio files in the currently selected playlist will play in order using its start and end markers. You can edit this just the same way you edit Keys, by right-clicking the audio file in the playlist.
If you want to pause the playlist after a certain file, just add a Pause item by clicking the ![]() button at the top of the playlist section. When the playlist reaches a pause item, it will temporarily stop the playlist until you hit the playlist's play button again.
button at the top of the playlist section. When the playlist reaches a pause item, it will temporarily stop the playlist until you hit the playlist's play button again.
If you want to add a Delay instead, just click on the ![]() button--this works a little differently than the pause item. When the playlist gets to a delay item, it will pause the playlist until the delay timer is finished and then continue to the next track on the playlist. To edit the delay time, just right-click the delay item.
button--this works a little differently than the pause item. When the playlist gets to a delay item, it will pause the playlist until the delay timer is finished and then continue to the next track on the playlist. To edit the delay time, just right-click the delay item.
If you need to delete tracks, select the tracks you want to delete and press the Delete key on your keyboard. You can also use ![]() button at the top-right of the playlist section.
button at the top-right of the playlist section.
To delete a playlist, just highlight the playlist you wish to delete and press the Delete key on your keyboard or click on the ![]() above the playlist. You cannot delete the On the fly playlist, it is only intended as a temporary playlist.
above the playlist. You cannot delete the On the fly playlist, it is only intended as a temporary playlist.
Controlling Playlists
You can play a playlist two ways: click the ![]() button on the top left corner of the playlist section on the main screen, or hit the shortcut key / (which can be assigned in the Keyboard Settings tab of the Preferences Window; you can MIDI assign this button as well). When you click the
button on the top left corner of the playlist section on the main screen, or hit the shortcut key / (which can be assigned in the Keyboard Settings tab of the Preferences Window; you can MIDI assign this button as well). When you click the ![]() button, audio will start playing from the currently highlighted playlist. To stop the playlist from playing, you can hit the
button, audio will start playing from the currently highlighted playlist. To stop the playlist from playing, you can hit the ![]() button, or hit the Auto-Play shortcut-key / (if assigned in Preferences) while holding down the Shift key.
button, or hit the Auto-Play shortcut-key / (if assigned in Preferences) while holding down the Shift key.
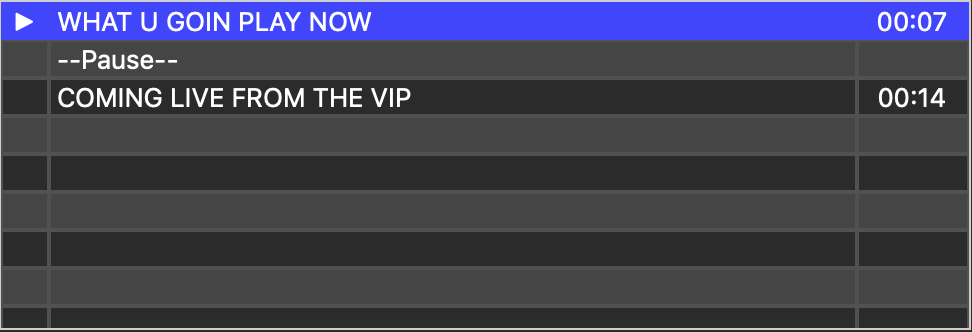
In the playlist window, you will see 3 columns. The first column is the status of the track, the middle column shows the display name (which can be changed by right-clicking the audio track), and the last column displays the time for the audio or delay track (which can also be changed by right-clicking the track). To select the next track to play in the playlist, double-click the status column of the track. You will notice that there will be ► in the status column; this means that when the current track is finished, the track you just selected will play next. The playlist will continue in order from that point forward. After a track is played, a • will appear in that track's status column. Clicking the ![]() at the top will clear the statuses of all tracks for the current playlist.
at the top will clear the statuses of all tracks for the current playlist.
What are the Different KueIt View Modes?
The 2 main views in KueIt are Full Screen Mode and Half Screen Mode.
Full Screen Mode is used when all the features of KueIt are needed from the Individual or Disk Jockey. To enter Full Screen Mode, click the Full Screen option in the View menu, or maximize the window. Click the maximize button again to return back to normal view.
Half Screen Mode is helpful when you want to use KueIt at the same time as other audio applications or programs. In this mode, you can toggle back and forth between programs by using the key combinations below:
| Mac | Windows |
|---|---|
| ⌘ + Tab | Alt + Tab |
In this mode, KueIt will only display the play keys. This is because when you are toggled in KueIt, you can still see the main operational data of most other DJ software on the screen. This allows for the best of both worlds. To enter Half Screen Mode, click the ![]() or
or ![]() buttons on the main screen to enter Half Screen mode.
buttons on the main screen to enter Half Screen mode.
Dragging Key Options
You can drag loaded keys to other keys on the main screen for additional options. Dragging actions include:
Dragging a Key to a Blank Key
Dragging and dropping a KueIt key to a blank key on the main screen gives you the following options:
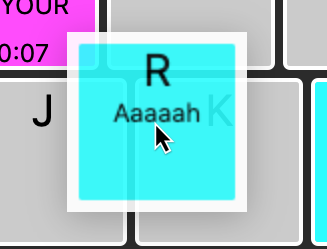
- Move: Moves the KueIt key to the new location
- Copy: Clones the KueIt key to the new location
- Cancel: Cancel the drag
Dragging a Key to Another Loaded Key
Dragging and dropping a KueIt Key to another loaded key on the main screen gives you the following options:
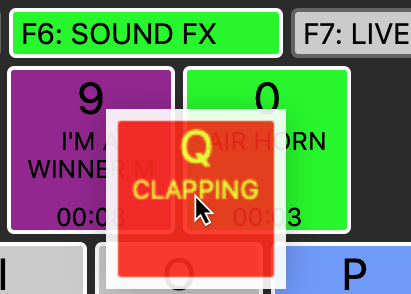
- Move & Replace: Moves the KueIt key and replaces the key in the new location
- Copy & Replace: Clones the KueIt key and replaces the key in the new location
- Swap: Swaps the key locations
- Cancel: Cancel the drag
Dragging a Key to the Trash
When dragging a KueIt Key, you will see a trash image on the right side of the main screen.
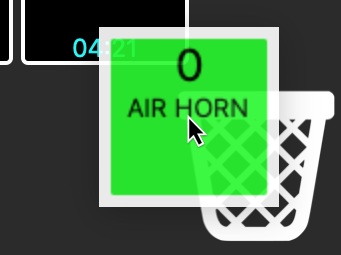
Drag and drop the KueIt key to the trash to clear the key from the profile.
Advanced Functions
In this section, we will explain how to use Global Hot Kues and MIDI to trigger KueIt keys and functions.
Using Global Hot Kues
When Global Hot Kues is on, your audio will trigger even if another program is running. This lets you run a second program simultaneously with KueIt. If Global Hot Kues is off, you can still toggle between KueIt and another program by using the key combination below:
| Mac | Windows |
|---|---|
| ⌘ + Tab | Alt + Tab |
The keyboard function will only work on the program that is currently in focus, unless Global Hot Kues is turned on (in which case the keyboard functions will trigger the KueIt audio even if KueIt is not in focus).
Note: the Global Hot Kues function is disabled when KueIt is first installed.
Starting with macOS Mojave, you will need to make a system adjustment in order to use Global Hot Kues:
Apple made some changes in Mojave where you need to adjust a setting to get Global Hot Kues to work in KueIt. In your System Preferences, go to Security & Privacy tab. Then, click on Accessibility in the list on the left. Click on the lock on the bottom left corner of the window to unlock it (you will need to enter a password to change this). Once unlocked, on the right list, click on the button and add the KueIt app to the list. Once you confirm adding KueIt, click on the lock icon again to lock it. Once you added KueIt to your trusted list, you will be able to use Global Hot Kues.
How to Enable/Disable the Global Hot Kues
In the Keyboard section of the Preferences Window, check the box next to Enable Global Hot Kues. When Global Hot Kues is enabled, you can still use shortcut keys to quickly turn this function on or off. Clicking the ` (back quote) key will turn Global Hot Kues on, and clicking the \ (backslash) key will turn Global Hot Kues off.
Note: if Global Hot Kues is not enabled in the Preferences window, Global Hot Kues and the Global Hot Kue On/Off shortcut keys will not work at all. This is to protect you from accidentally enabling Global Hot Kues.
Using MIDI in KueIt
KueIt allows you to MIDI map your devices to KueIt functions. KueIt has MIDI enabled by default. You can enable/disable MIDI in KueIt by going into the MIDI tab in the Preferences Window. Once MIDI is enabled, you can assign and trigger MIDI in KueIt.
Note: When using KueIt with MIDI, make sure the program is never minimized. In some systems, minimizing a program can put it to sleep, which can cause the MIDI in KueIt to go to sleep as well.
Mapping MIDI controls
You can assign individual trigger keys and volumes, and you can also assign the Stop All key as well as others. To assign MIDI, click the button on the main screen of KueIt. You will see the button turn blue, confirming that you are in MIDI assign mode.

If you do not see the button, then you need to enable MIDI in the MIDI tab of the Preferences Window
Once in MIDI assign mode, you will see all assignable KueIt functions have a red or green border around them. Red means that there is no MIDI mapped to that particular function, and green means you have at least one MIDI mapping assigned to it.
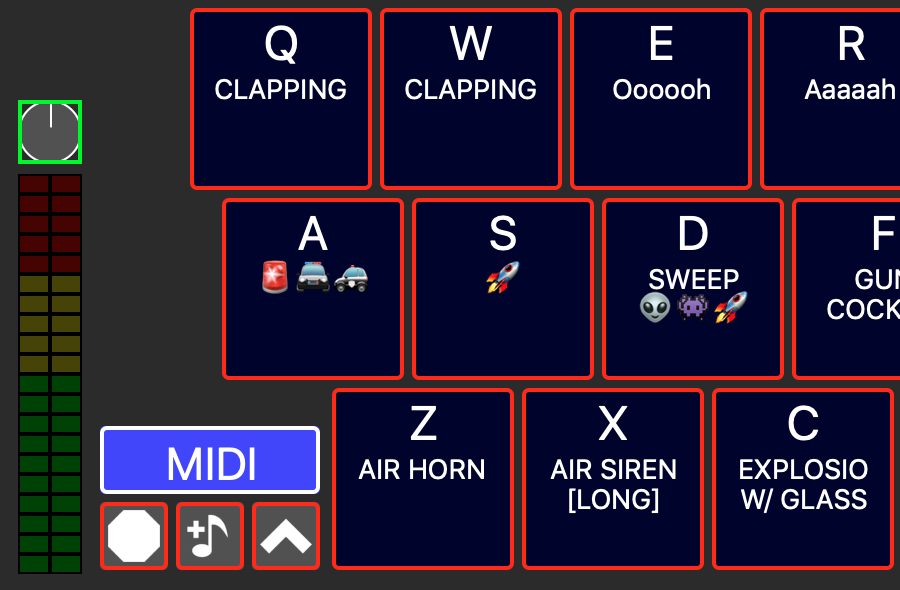
To assign your MIDI control (i.e. button, pad, knob or slide) to a KueIt function, click on any of the red or green bordered KueIt controls. This will open up a Learn MIDI Command window.
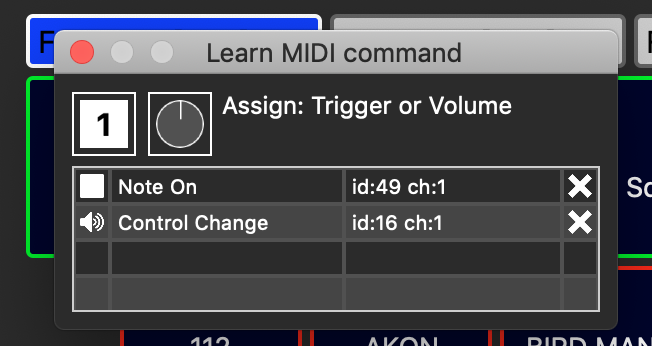
If you already have MIDI mapped to the selected KueIt function, you will see the MIDI mapping in the list. The first column shows the icon type of the MIDI mapping. The second column shows the type of MIDI command (i.e. Note On, Control Change, etc.). The third column shows the MIDI control ID number and channel. The fourth column has an ![]() button to clear the MIDI mapping.
button to clear the MIDI mapping.
To assign a new MIDI mapping, click on the available buttons at the top of the window. If it is a trigger type, then it will ask you to Hit a MIDI button. Hitting any button on your MIDI device will map that button to the KueIt function. If your assigning button is a knob type, it will ask you to Adjust a MIDI control. Adjusting any knob or slide on your MIDI device will map it to the KueIt function. Repeat this process for each item you want MIDI assigned to, and when you're finished, click the button on the main screen to end MIDI assign mode.
Note: You can assign more than one MIDI control to a KueIt function. All MIDI mappings are automatically saved to your profile.
KueIt Preferences
There are a few ways to launch the KueIt Preferences Window. Click Preferences in the KueIt menu (File menu for Windows users).
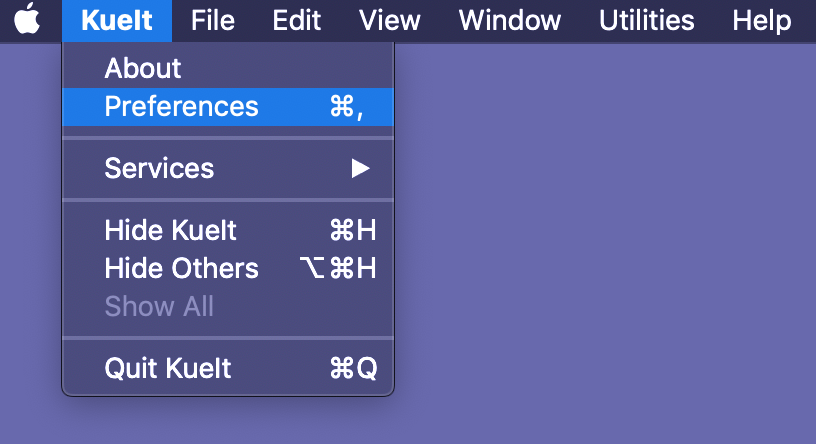
You can also use the shortcuts below:
| Mac | Windows |
|---|---|
| ⌘ + , | Ctrl + , |
Clicking on the triple line icon at the top-right corner of KueIt will also launch the Preferences Window.

The Preferences Window has a few tabs:

Click on any of the tab descriptions below to see more detailed information:
 |
Main Settings |

|
Default Settings |
 |
Global Settings |

|
Keyboard Settings |
 |
Audio Settings |
 |
MIDI Settings |
 |
Clock Settings |
Main Settings
Click the first icon in the tab bar of the Preferences Window to go to the Main Settings tab.
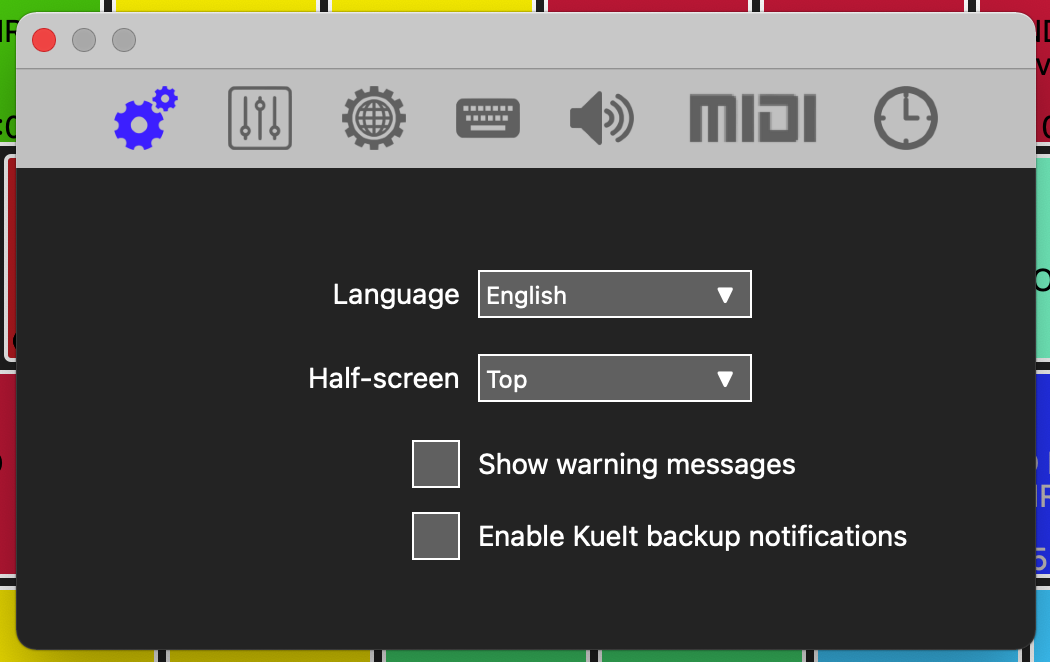
In this tab, you can change the following:
Language: Choose English, Espańol, Italiano, Français, or Deutsche
Half-screen: Make KueIt anchor to either Top or Bottom when in Half-Screen mode
Show Warning Messages: Whether to show any pop-up warning messages
Enable KueIt Backup Notifications: Allow KueIt to remind you to backup your data
Default Settings
Click the second icon in the tab bar of the Preferences Window to go to the Default Settings tab.
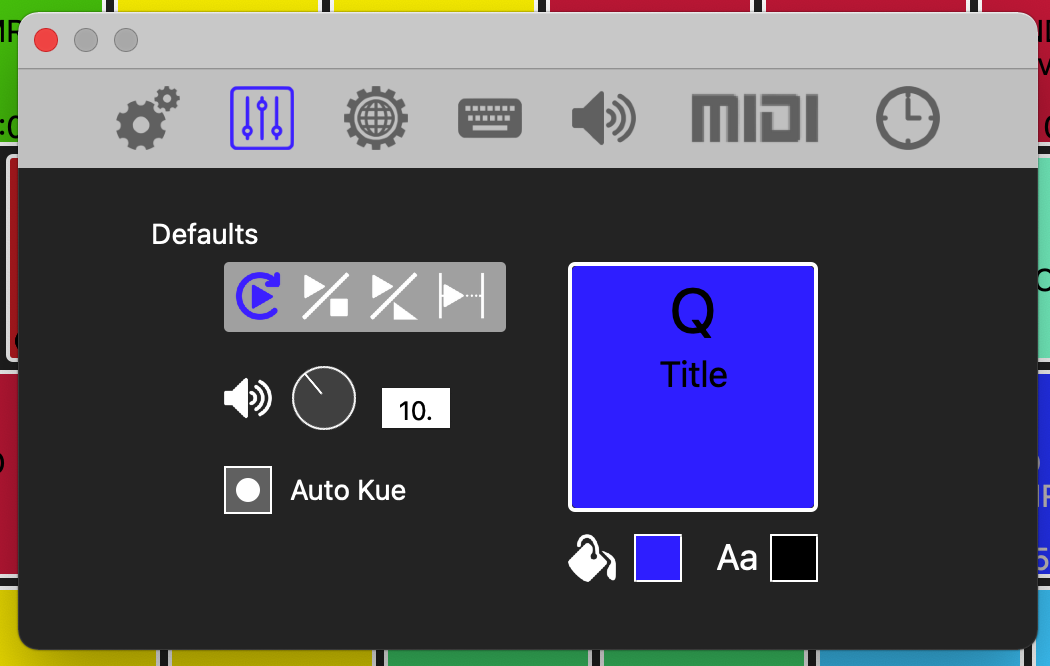
These are your default settings. These settings will be applied to any new files loaded in KueIt. In this tab, you can change the following:
Play mode: Choose either Trigger, Toggle or Sticky. Please see Selecting the Play Mode
Volume: Adjust the knob or enter in a default volume (values between 0-30, decimals accepted)
Auto Kue: Enabling this allows KueIt to automatically set the start point to the first sound detected when loading a new audio file
Key and Font Colors: Click the color squares to choose your key and font colors
Global Settings
Click the third icon in the tab bar of the Preferences Window to go to the Global Settings tab.
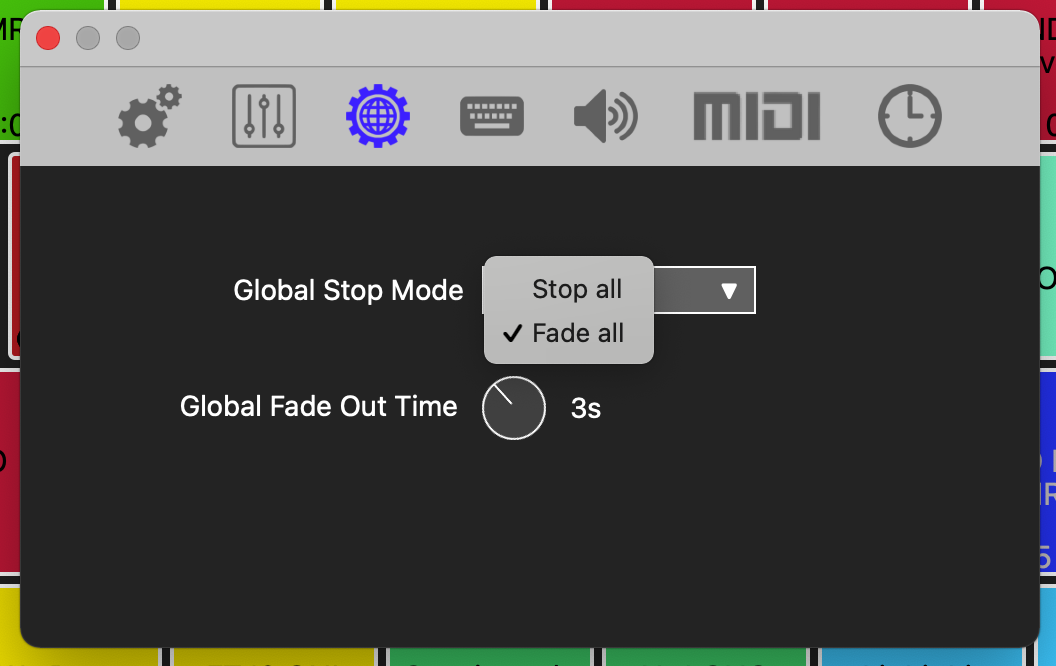
There you can select Stop All or Fade All mode. You can also select the Global Fade Out Time duration. Fade time duration is calculated in seconds.
Keyboard Settings
Click the fourth icon in the tab bar of the Preferences Window to go to the Keyboard Settings tab.
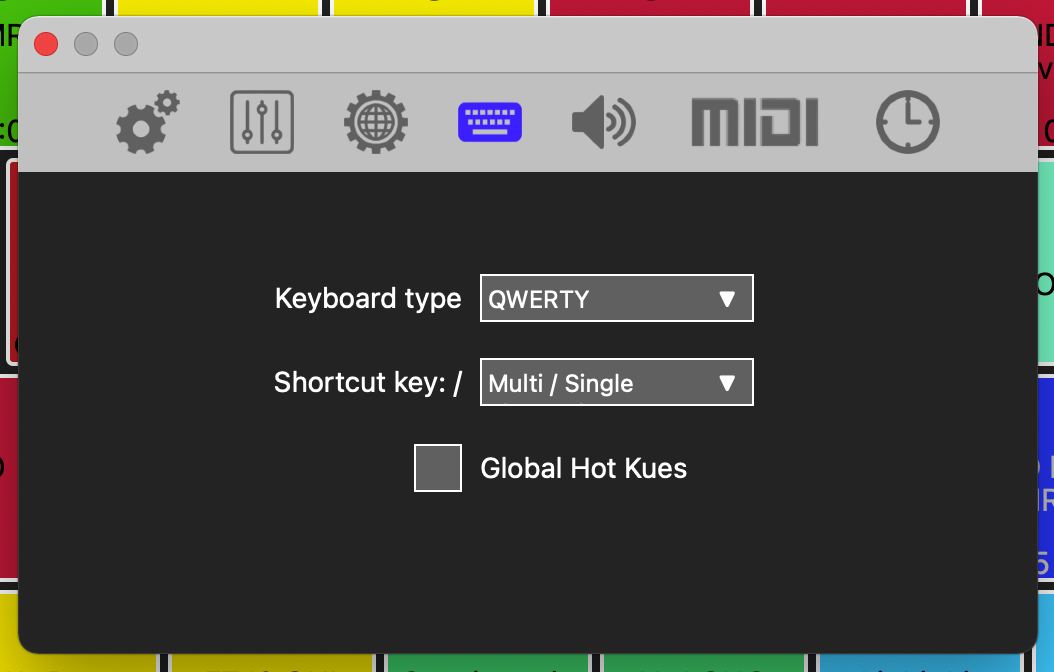
In this tab, you can change the following:
Keyboard type: Choose either QWERTY, QWERTZ, or AZERTY
Shortcut Key: Assign the / key to either Multi/Single Playmode or Auto-Play (playlist)
Global Hot Kues: Enable or disable Global Hot Kues
The shortcut will depend on what language your keyboard is set to:
| Language | Key |
|---|---|
| English | / |
| Espańol | ç |
| Italiano | - |
| Français | = |
| Deutsche | - |
Audio Settings
Click the fifth icon in the tab bar of the Preferences Window to go to the Audio Settings tab.
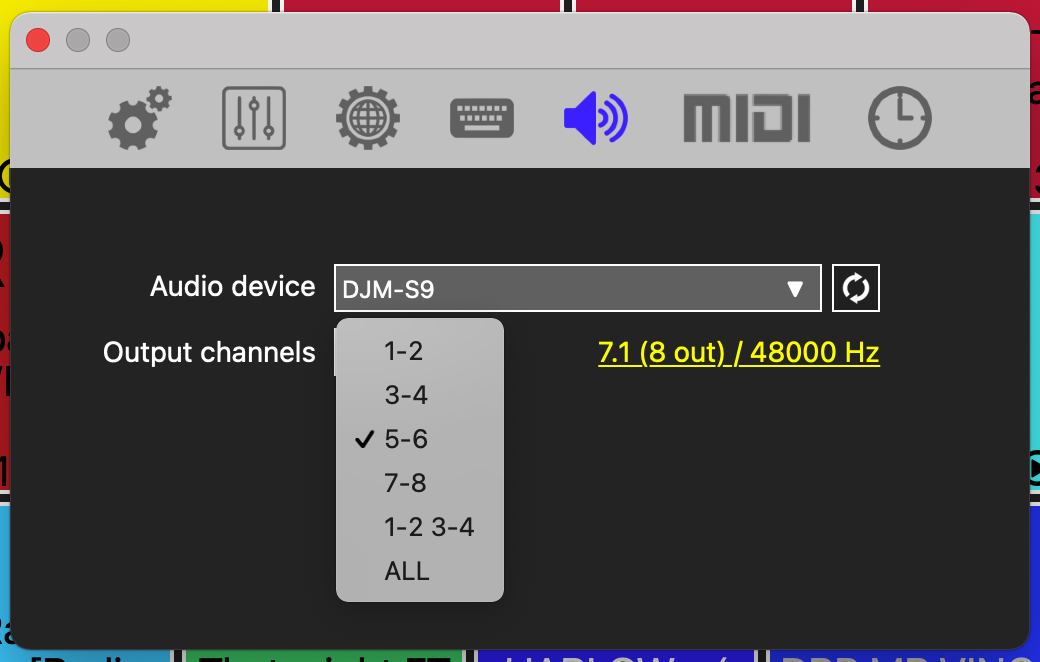
In this tab, you can change the following:
Audio Device: Select your connected audio device from the list
Output Channels: Select the output channels of your audio device
Refresh Devices: Click on the refresh icon to refresh the audio device list
Sometimes the macOS defaults your audio devices to the stereo 2 channel output. Here is how to change this:
In the KueIt audio settings tab, click on the yellow link that reads (2 out) / 48000 Hz (or similar)
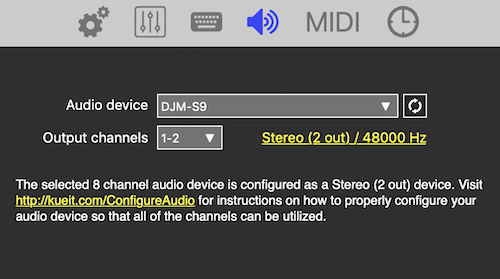
Your system's audio setup app should open up. Highlight your audio device from the list on the left, then click on the Configure Speakers button in the lower right corner of the window.
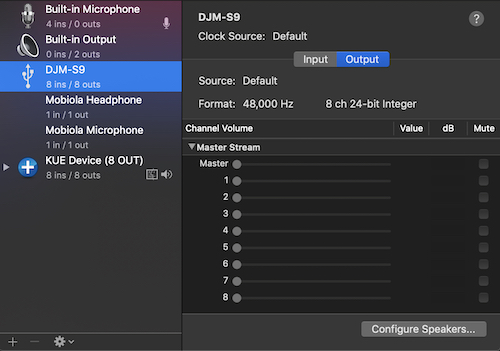
Inside this window, click on the Configuration pulldown at the top to see the list out output configurations. Select the highest one in the list (i.e. 7.1 Rear Surround) and hit Apply at the bottom of the window. Then hit Done and close this setup app.
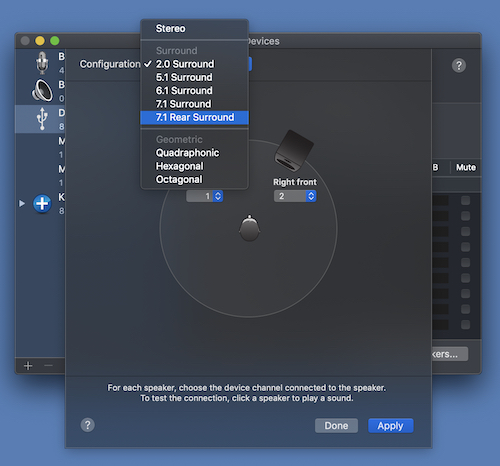
Go back to the KueIt audio settings tab and click on the refresh devices icon. Your selected audio device should now be configured so you can select more output channels.
MIDI Settings
Click the MIDI icon in the tab bar of the Preferences Window to go to the MIDI Settings tab.
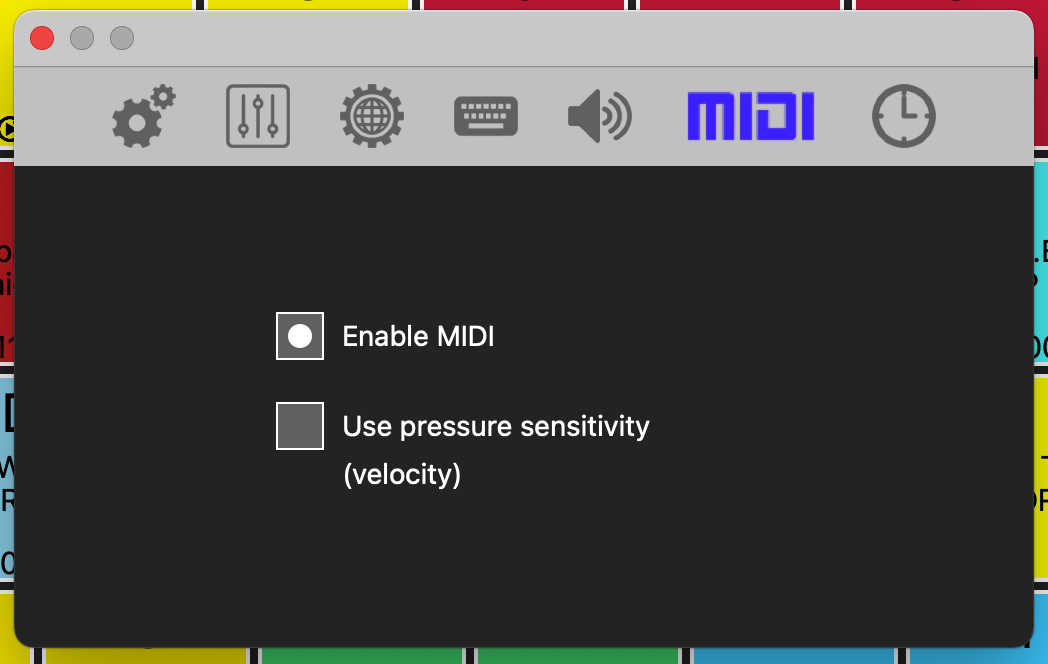
In this tab, you can change the following:
Enable MIDI: Allow KueIt to use MIDI
Use Pressure Sensitivity: KueIt will use the velocity from hitting a MIDI button on the device and trigger the audio in relation to how hard the hit was (i.e. Harder the hit, loader the volume)
Please see Using MIDI in KueIt
Clock Settings
Click the last icon in the tab bar of the Preferences Window to go to the Clock Settings tab.
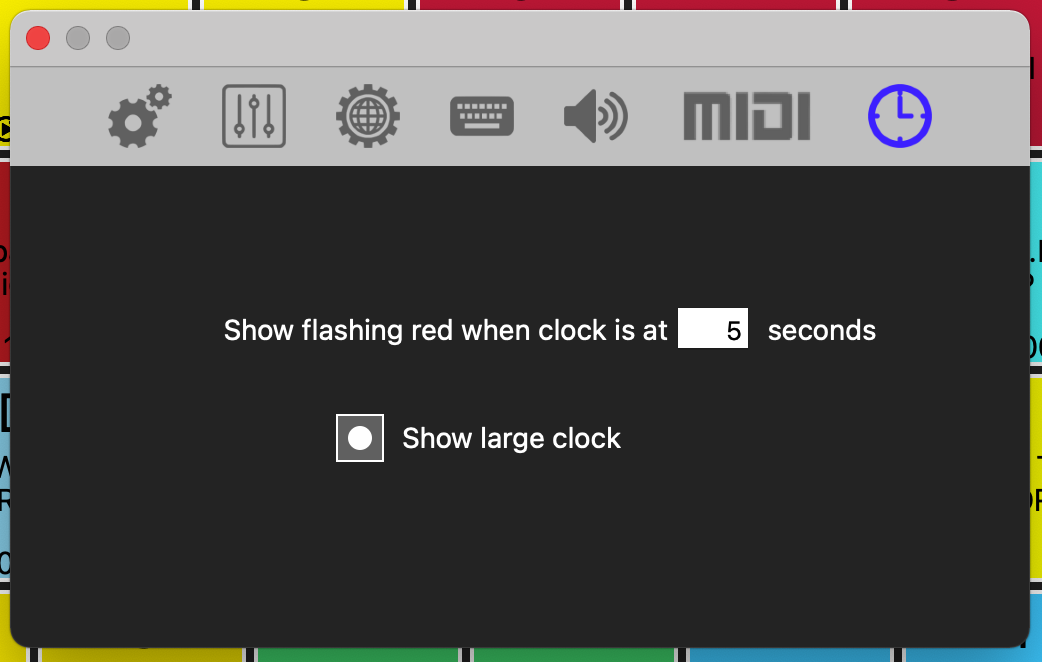
In this tab, you can change the following:
Show flashing red when clock is at # seconds: When a KueIt key is playing audio, the key will be flashing green. It will start flashing red when there is # seconds remaining. Enter in the amount of seconds in the box.
Show large clock: Enabling this will show a large clock timer in the playing KueIt key
Menu Actions
Below are the KueIt menu actions. Click on any one of them to see more detailed information.
- File:
- New Profile
- Load Profile
- Manage Profiles
- Backup KueIt Data
- Load From Backup
- Window:
- Reset Window Position
- Utilites:
- Import MIDI
- Export MIDI
- Delete MIDI Mappings
- Import Old KueIt Profile
- Help:
- Send a Bug Report
Manage Profiles
Click on Manage Profiles in the File menu to launch the Manage Profiles Window.
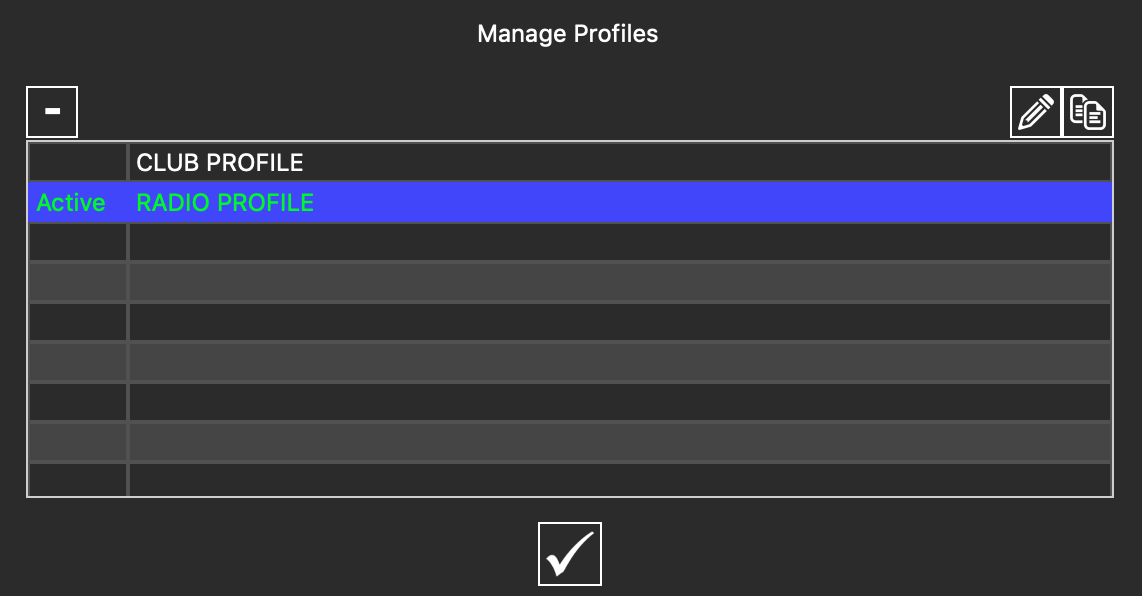
In this window, you can edit the names of the profiles, delete profiles, and duplicate a profile. To edit a profile name, double click the profile you wish to change the name to. You can also click on the ![]() icon to edit the name of the highlighted profile. After typing in the new name, hit the Enter key to apply the change. To delete a profile, highlight the profile you wish to delete, and click the
icon to edit the name of the highlighted profile. After typing in the new name, hit the Enter key to apply the change. To delete a profile, highlight the profile you wish to delete, and click the ![]() button or hit the Delete key on your keyboard to delete it. To duplicate a profile, highlight the profile you wish to clone and click on the
button or hit the Delete key on your keyboard to delete it. To duplicate a profile, highlight the profile you wish to clone and click on the ![]() icon.
icon.
Note: You cannot delete the active profile that is currently loaded in KueIt. To delete it, you must load another profile first, then delete it in this window.
Backup KueIt Data
You can create a backup of your whole entire KueIt data. We recommend backing up your data occasionally on external drives in case of computer failure. You can later import your backups and have KueIt running again in no time. To backup, click on Backup KueIt Data in the File menu. Select a location and click the button to create the backup.
Load From Backup
At anytime you can load a saved backup to your KueIt system. Please see Backup KueIt Data above to learn how to create a KueIt backup. Simply click on Load From KueIt Backup in the File menu. KueIt will need to shut down in order to continue. Once KueIt shuts down, relaunch it and follow the instructions to load from a backup.
Note: Loading from a backup will not merge your backup data with the current KueIt data. It will completely overwrite everything. Proceed with caution.
Reset Window Position
You can reset the window to its default size and position. This can be useful if you are working with multiple screens, as sometimes if a screen is unplugged, programs will move to another screen in unintended ways. Click on Reset Window Position from the Window menu to reset it.
Import MIDI
You can import MIDI mappings that are exported from KueIt or from older versions of KueIt. Simply click on Import MIDI from the Utilities menu. Then, select the MIDI mapping file you wish to import to your current profile.
Old KueIt MIDI mappings (.kmp files) were stored in the following directory:
[your music folder]/KueIt/Midi
Export MIDI
You can export MIDI mappings from your current profile to your computer (saved as a .kmm file). This MIDI mapping file can later be imported by using the Import MIDI utility. Simply click on Export MIDI from the Utilities menu. Then, select a location you want to export the file to.
Delete MIDI Mappings
Instead of deleting MIDI mappings one by one, you can delete all of the MIDI mappings in your current profile. Simply click on Delete MIDI Mappings from the Utilities menu.
Note: This function cannot be undone. Proceed with caution.
Import Old KueIt Profile
If you used an older version of KueIt, you can import and start using your old KueIt profiles. Simply click on Import Old KueIt Profile from the Utilities menu. Then, select your old KueIt profile (.kue file) in the pop-up window to import it. Once imported, you can Load your profile in the File menu.
Although you were able to pick your own location for your profiles in older versions of KueIt, the default location were stored in the following directory:
[your music folder]/KueIt
Send A Bug Report
You can send feedback on KueIt, including information on any errors you have encountered with our bug reporting tool. Click Send Bug Report in the Help menu. This will launch a pop-up window. In the text box, enter any comments or information about your errors, then click on the Send Bug Report button.
Now Playing section
You can view all currently playing audio in the Now Playing tab found in the lower left section of KueIt. You will also see the time remaining next to each track in the list. When audio tracks finish, they will dissapear from the Now Playing list.

The most recent triggered audio clip will also be shown in the Currently Playing section at the top of the KueIt screen.

Recently Played List
KueIt keeps track of all the files that are played during each session, and stores them in a list in the lower left corner of the program. This list is displayed in the order the files were played, beginning with with the most recent.

You can export the list and save it as a text file by clicking the ![]() button above it.
button above it.
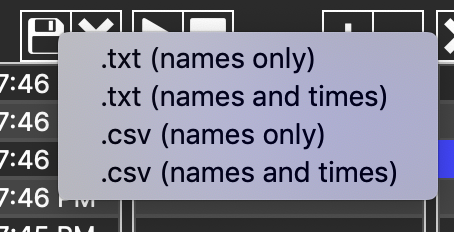
In the pop-up menu, select the type of file you wish to export as. Here are your export options:
| .txt (names only) | Export as a text file with only the display names |
| .txt (names & times) | Export as a text file both display names and times |
| .csv (names only) | Export as a 'comma separated values' file with only the display names |
| .csv (names & times) | Export as a 'comma separated values' file both display names and times |
If you would like to clear the list, just click the ![]() button located directly above it.
button located directly above it.
Outputting Audio From Your Hardware
KueIt will automatically use the default audio device in your computer to play audio, so we strongly suggest that you use a computer with a high-end audio device. A higher quality audio device will run KueIt more efficiently while giving you much cleaner audio.
KueIt also allows you to select your DJ controller/mixer as your audio device. Newer audio devices ,controllers and mixers come as multi-channel devices. If you are trying to output KueIt audio using your DJ controller or mixer, you most likely need to select the auxiliary output channels in the KueIt preferences. Most DJ controllers and mixers come set as the following configuration:
| Channels | Description |
|---|---|
| 1 & 2 | Left Deck |
| 3 & 4 | Right Deck |
| 5 & 6 | Auxiliary Output |
Please check your device's manual for the correct channel configuration
See Selecting an Audio Device to select your multi-channel audio device and channel outputs.
If you're running KueIt from your Built-in audio device, a 1/8th inch to RCA wire will come in handy. Simply plug the 1/8th inch end into the output from your computer, and the RCA end into an input on your DJ Mixer or PA system. This output size is the standard size for many desktop and tower computers, though you may find different style output jacks on some audio devices.
To select an audio device, please see Audio Settings


